
How To Make a Gamepass in Roblox Pls Donate
Unlock the secret to How To Make a Gamepass in Roblox Pls Donate! Expert tips and step-by-step guide. Donations appreciated.
Welcome to our friendly guide on how to create a gamepass in Roblox! In this blog post, we'll walk you through the step-by-step process of creating and implementing a gamepass using Roblox Studio. Whether you're looking to monetize your game or simply enhance the player experience, this guide has got you covered.Roblox is a popular online platform that allows users to create and play games created by other users. One of the ways to monetize your games on Roblox is by creating gamepasses. Gamepasses are special items that players can purchase using Robux, the in-game currency. These gamepasses can provide players with special abilities, items, or perks that enhance their gameplay experience.
To begin, open your preferred web browser and navigate to the Roblox Creator Hub on the platform's Home Page. Once there, click on the "Create" tab and proceed to Experiences. This will take you to Roblox Studio, the tool used for creating and editing games on the platform.
Within the "Place" section of Experiences, locate and click on "Monetization Products." From the available options, choose "Passes" as our focus is on creating a gamepass. This will take you to the Passes section, where you can create and manage your gamepasses.
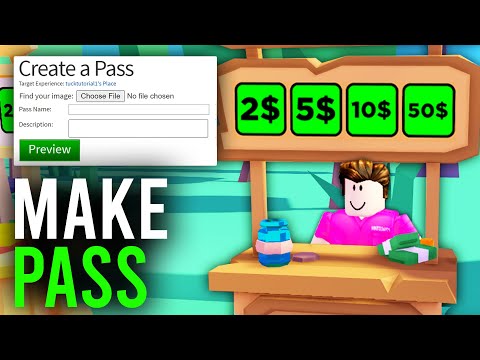
Now that you've reached the Passes section, it's time to get creative! Click on "Create A Pass" and let your imagination run wild. Start by adding an eye-catching image that represents your gamepass. This image will be displayed to players when they are browsing gamepasses. Make sure it accurately represents what your gamepass offers and catches the attention of potential buyers.
Next, give your gamepass a memorable name. This name should be descriptive and reflect the benefits or features of the gamepass. For example, if your gamepass grants players access to exclusive areas in your game, you could name it "VIP Access Pass."
After naming your gamepass, write a captivating description that entices players. Highlight the benefits and features of your gamepass, and explain why it is worth purchasing. Be creative and persuasive in your description to increase the chances of players buying your gamepass.
Learn how to safely and effectively get the Blowtorch in the game The Fields. Our step-by-step guide reveals the exact location and method to securethis key tool.
All Armor Recipes in The Forge
Craft every piece! A complete list of all armor recipes in The Forge mod forMinecraft, with materials, tiers, and crafting grid layouts. Getequipped.
How To Find Lucky Blocks in The Forge
Discover steps to locate Lucky Blocks in The Forge game mode, plus tips forclaiming rare rewards to boost your gameplay and collection.
How To Craft the Crusader Sword in The Forge
Learn how to craft the Crusader Sword in The Forge with this step-by-stepguide. Find required materials, forging techniques, and tips formastering this powerful medieval weapon.
How To Find Captain Rowan in the Forge
Find Captain Rowan in The Forge with our step-by-step guide. Uncover hiddenlocations, complete critical quests, and earn exclusive rewards. Startyour search now.
How To Craft the Double Battle Axe in The Forge
Learn how to craft the powerful Double Battle Axe in The Forge. Get astep-by-step guide on required materials, forge mechanics, and pro tipsto successfully create this formidable weapon for your arsenal.
All Magic in Brew a Potion
Brew your own magic at home! All Magic in Brew a Potion offers easy,step-by-step recipes and kits for making magical potions, elixirs, andspell jars. Perfect for beginners and seasoned witches alike.
How To Play Survive Wave Z
Learn how to play Survive Wave Z with essential tips on characterselection, weapons, and strategies to survive relentless zombie hordes.Master wave tactics, unlock upgrades, and outlast the undead apocalypse.
How To Craft the Rapier in The Forge
Learn how to craft the powerful Rapier in The Forge. Our step-by-step guidecovers required materials, recipes, and strategies for forging this fast and deadly piercing weapon.
How To Change Race in The Forge
Learn step-by-step methods to change your character's race in The Forge.Discover in-game options, console commands, or modding solutions forrace customization.
How to Participate in Multiple Events in My Time at Sandrock
Master How to Participate in Multiple Events in My Time at Sandrock! Our guide offers practical tips on balancing.
How to Play Alan Wake 2 on Steam Deck
How to Play Alan Wake 2 on Steam Deck with our foolproof guide. Unleash gaming potential and tackle every eerie twist.
How to Make Dot Crosshair in The Finals
Master your aim in the finals with our easy guide on How to Make Dot Crosshair in The Finals. Enhance your game skills.
Hpw to Fix Destiny 2 Stuck On Happy Hunting Ground Not Progressing
Hpw to Fix Destiny 2 Stuck On Happy Hunting Ground Not Progressing? Our guide will smoothly navigate.
How to Logout from Clash of Clans
Master the steps to How to Logout from Clash of Clans and secure your game data. Easy-to-follow guide for all CoC users.
Welcome to our friendly guide on how to create a gamepass in Roblox! In this blog post, we'll walk you through the step-by-step process of creating and implementing a gamepass using Roblox Studio. Whether you're looking to monetize your game or simply enhance the player experience, this guide has got you covered.Roblox is a popular online platform that allows users to create and play games created by other users. One of the ways to monetize your games on Roblox is by creating gamepasses. Gamepasses are special items that players can purchase using Robux, the in-game currency. These gamepasses can provide players with special abilities, items, or perks that enhance their gameplay experience.
How To Make a Gamepass in Roblox Pls Donate
Step 1: Accessing Roblox Studio
To begin, open your preferred web browser and navigate to the Roblox Creator Hub on the platform's Home Page. Once there, click on the "Create" tab and proceed to Experiences. This will take you to Roblox Studio, the tool used for creating and editing games on the platform.
Step 2: Selecting Monetization Products
Within the "Place" section of Experiences, locate and click on "Monetization Products." From the available options, choose "Passes" as our focus is on creating a gamepass. This will take you to the Passes section, where you can create and manage your gamepasses.
Step 3: Creating Your Gamepass
Now that you've reached the Passes section, it's time to get creative! Click on "Create A Pass" and let your imagination run wild. Start by adding an eye-catching image that represents your gamepass. This image will be displayed to players when they are browsing gamepasses. Make sure it accurately represents what your gamepass offers and catches the attention of potential buyers.
Next, give your gamepass a memorable name. This name should be descriptive and reflect the benefits or features of the gamepass. For example, if your gamepass grants players access to exclusive areas in your game, you could name it "VIP Access Pass."
After naming your gamepass, write a captivating description that entices players. Highlight the benefits and features of your gamepass, and explain why it is worth purchasing. Be creative and persuasive in your description to increase the chances of players buying your gamepass.
Step 4: Setting the Value
While creating your pass, you'll need to assign a value in Robux currency. It's important to note that Roblox retains 30% of your earnings from these transactions, so keep that in mind when deciding on the value. Consider the value and benefits your gamepass provides and set a fair price that players would be willing to pay.
It's also worth researching similar gamepasses in the Roblox marketplace to get an idea of the pricing range. Setting a price too high may discourage potential buyers, while setting it too low may undervalue your gamepass.
Step 5: Implementing Your Gamepass
With your gamepass created, it's time to put it into action! Enter your game environment in Roblox Studio and identify a relevant item or feature that you want to associate with your gamepass. For example, if your gamepass grants players a special weapon, you can create a weapon stand or chest where players can claim the item.
Edit the item or feature and select the gamepass you've just created. This will link the gamepass to the item, ensuring that only players who own the gamepass can access or use it.
To test and activate your gamepass for players, launch your game, and join as a player. Locate the item or feature associated with your gamepass and try to interact with it. If everything is set up correctly, you should be able to claim the item or activate the feature as a player who owns the gamepass.
In conclusion, creating a gamepass in Roblox is a great way to monetize your game and enhance the player experience. By following the step-by-step guide outlined in this blog post, you can create and implement a gamepass using Roblox Studio. Remember to be creative, descriptive, and persuasive when designing your gamepass, and set a fair price that reflects its value.
Tags: online game, virtual world, multiplayer game, gaming platform, user-generated content, avatar customization, virtual eco
Platform(s): Windows PC, macOS, iOS, Android, Xbox One
Genre(s): Game creation system, massively multiplayer online
Developer(s): Roblox Corporation
Publisher(s): Roblox Corporation
Engine: OGRE 3D
Mode: Multiplayer
Age rating (PEGI): 7+
Other Articles Related
How To Get Blowtorch In The FieldsLearn how to safely and effectively get the Blowtorch in the game The Fields. Our step-by-step guide reveals the exact location and method to securethis key tool.
All Armor Recipes in The Forge
Craft every piece! A complete list of all armor recipes in The Forge mod forMinecraft, with materials, tiers, and crafting grid layouts. Getequipped.
How To Find Lucky Blocks in The Forge
Discover steps to locate Lucky Blocks in The Forge game mode, plus tips forclaiming rare rewards to boost your gameplay and collection.
How To Craft the Crusader Sword in The Forge
Learn how to craft the Crusader Sword in The Forge with this step-by-stepguide. Find required materials, forging techniques, and tips formastering this powerful medieval weapon.
How To Find Captain Rowan in the Forge
Find Captain Rowan in The Forge with our step-by-step guide. Uncover hiddenlocations, complete critical quests, and earn exclusive rewards. Startyour search now.
How To Craft the Double Battle Axe in The Forge
Learn how to craft the powerful Double Battle Axe in The Forge. Get astep-by-step guide on required materials, forge mechanics, and pro tipsto successfully create this formidable weapon for your arsenal.
All Magic in Brew a Potion
Brew your own magic at home! All Magic in Brew a Potion offers easy,step-by-step recipes and kits for making magical potions, elixirs, andspell jars. Perfect for beginners and seasoned witches alike.
How To Play Survive Wave Z
Learn how to play Survive Wave Z with essential tips on characterselection, weapons, and strategies to survive relentless zombie hordes.Master wave tactics, unlock upgrades, and outlast the undead apocalypse.
How To Craft the Rapier in The Forge
Learn how to craft the powerful Rapier in The Forge. Our step-by-step guidecovers required materials, recipes, and strategies for forging this fast and deadly piercing weapon.
How To Change Race in The Forge
Learn step-by-step methods to change your character's race in The Forge.Discover in-game options, console commands, or modding solutions forrace customization.
How to Participate in Multiple Events in My Time at Sandrock
Master How to Participate in Multiple Events in My Time at Sandrock! Our guide offers practical tips on balancing.
How to Play Alan Wake 2 on Steam Deck
How to Play Alan Wake 2 on Steam Deck with our foolproof guide. Unleash gaming potential and tackle every eerie twist.
How to Make Dot Crosshair in The Finals
Master your aim in the finals with our easy guide on How to Make Dot Crosshair in The Finals. Enhance your game skills.
Hpw to Fix Destiny 2 Stuck On Happy Hunting Ground Not Progressing
Hpw to Fix Destiny 2 Stuck On Happy Hunting Ground Not Progressing? Our guide will smoothly navigate.
How to Logout from Clash of Clans
Master the steps to How to Logout from Clash of Clans and secure your game data. Easy-to-follow guide for all CoC users.