
How to Apply Thermal Paste Correctly
Causes of Poor Thermal Performance (Why Paste Matters)
Before we fix the application, it helps to know what we’re fixing. High temperatures aren't always the paste's fault, but it's often a prime suspect.For most modern CPUs (both Intel LGA and AMD AM4/AM5), the simplest and most reliable method is the "Pea-Sized Dot" in the center. Clean the old paste thoroughly with isopropyl alcohol (90%+), apply a small dot (about 4-5mm diameter) of quality paste dead center, then firmly and evenly mount your cooler. That’s it for 95% of users. Now, for the why and the detailed how, read on.
Detailed Step-by-Step Guide to Applying Thermal Paste
Gather your tools: Your thermal paste (any reputable brand like Arctic MX-6, Noctua NT-H2, or Thermal Grizzly Kryonaut), isopropyl alcohol (90%+ preferred), lint-free coffee filters or microfiber cloths, and optionally, latex gloves.Step 1: The Clean Slate (The Most Important Step)
Power down, unplug, and remove your cooler. You’ll see the old paste on the CPU heat spreader and cooler base. Dampen a lint-free cloth with isopropyl alcohol. Gently wipe the old paste away from both surfaces. Use a fresh cloth/alcohol to do a final polish until both surfaces are shiny and clean. Never use anything abrasive like paper towels, which can leave scratches and lint.Step 2: Paste Selection & Prep
Not all pastes are equal. Most are non-conductive (safe around motherboard components), but some high-performance pastes are conductive (requires extreme care). For 99% of gamers, a high-quality, non-conductive paste is perfect. Give the tube a gentle squeeze to bring compound to the nozzle before applying.Step 3: The Application Method (Choosing Your Pattern)
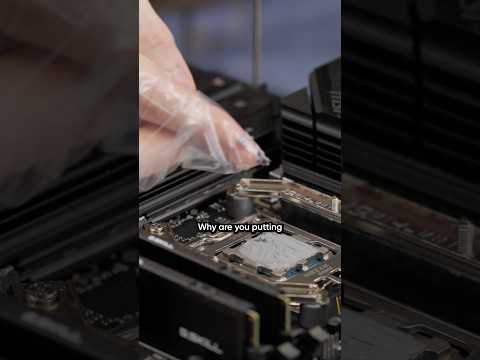
This is the art. The goal is to achieve a thin, even layer that covers the entire heat spreader under pressure. Here are the trusted methods:
- The Pea/Dot Method (Most Recommended): A single, small dot in the center of the CPU. As you mount the cooler,pressure will spread it out evenly. Ideal for most modern square CPUs.
- The Line Method: A thin line down the center. Great for newer rectangular CPUs (some Intel 12th/13th/14th Gen chips).
- The Spread Method (Controversial): Using a glove, tool, or credit card to manually spread a thin, evenlayer across the entire CPU. Riskier, as it can introduce air bubbles if done poorly. Only recommended if you’re confident.
- The X Method: An "X" from corner to corner. An older method that often leads toover-application. Generally not needed with modern paste viscosity.
For most gamers on modern platforms (PC), stick with the Pea or Line method.
Step 4: Mounting the Cooler (The Moment of Truth)
This is critical. Place the cooler straight down onto the CPU. Do not slide, wiggle, or twist it laterally once it has touched the paste.Align the screws or mounting brackets, and begin tightening in a cross pattern (e.g., top left, then bottom right, then top right, then bottom left).Tighten each screw a few turns at a time, gradually and evenly applyingpressure. This ensures the paste spreads uniformly without creatingvoids.
Step 5: The Final Check & Boot
Once the cooler is firmly and evenly mounted, connect the fan cable(s). Do a visual check for any massive, obvious spills of paste (a tiny seep atthe very edge is usually fine). Reconnect everything else, power on, and enter your BIOS/UEFI. Check your idle CPU temperature. It should bereasonable (usually 5-10°C above ambient room temperature). Then bootinto Windows and run a stress test like Cinebench or Prime95 whilemonitoring temps with HWMonitor. Watch for stable temperatures underload.
Alternative Solutions & Considerations
- Thermal Pads: For certain components (VRMs, RAM), thermal pads are the standard. They come in different thicknesses and conductivities. Never substitutepaste for a pad where a pad is required, as it will create a gap.
- Liquid Metal: This is the extreme end—highly conductive and risky. It’s for expertoverclockers delidding CPUs or applying to high-end GPUs. It canpermanently stain components and is electrically conductive; a spill can kill your hardware. Not recommended for first-time builders.
- Pre-Applied Paste: Many stock coolers come with paste pre-applied. It’s perfectly fine touse, but if you’re remounting, you must clean it off and apply freshpaste.
How to Prevent Thermal Paste Issues in the Future
- Re-paste Periodically: A good rule of thumb is to change your thermal paste every 2-3 yearsfor a high-use gaming PC, or if you notice a sustained increase inidle/load temperatures.
- Invest in Quality: Don’t cheap out. A $10 tube of high-quality paste lasts for manyapplications and is a tiny investment compared to your CPU/GPU.
- Mounting Pressure is Key: Always follow your cooler’s manual for mounting instructions. Uneven pressure is a silent killer of thermal performance.
- Store Paste Properly: Keep the tube capped tightly and store it in a cool, dry place to extend its shelf life.
Frequently Asked Questions (FAQs)
Q: Can you use too little thermal paste?
A: Yes, but it's far less common than using too much. Too little pastewon't cover the entire heat spreader, leading to hotspots and hightemperatures. A proper pea-sized dot is the sweet spot.
Q: Do I need to reapply paste if I remove my cooler?
A: Yes, absolutely. Once the cooler is lifted, the paste layer is broken and air pocketsare introduced. You must clean off the old paste from both surfaces andapply a fresh, new layer.
Q: What’s the difference between ceramic-based and metal-based pastes?
A: Ceramic-based pastes are non-conductive and very safe. Metal-based(often containing silver or aluminum) are slightly more conductive butcan be electrically conductive. For most users, the performancedifference is negligible, and a non-conductive paste is the saferchoice.
Q: How tight should my cooler screws be?
A: Snug, but not Hercules-tight. Tighten until the screw stops naturally(when it's fully threaded in). Most coolers are designed to bottom out.Overtightening can damage the motherboard or warp the CPU socket.
Q: Is the pre-applied paste on my stock cooler good enough?
A: It's perfectly adequate for running your CPU at stock settings. If youplan on overclocking or want the absolute best temperatures and noiselevels, replacing it with a high-quality paste can offer an improvement.
Mastering the art of thermal paste application is a rite of passage for every PCgamer. It’s a small step in the building process that pays massivedividends in system stability, longevity, and performance. Now that your CPU is cooling efficiently, you can get back to what matters:dominating the competition, exploring vast open worlds, and enjoyingyour games the way they were meant to be played.
Got your temperatures under control? Share your before-and-after temp drops in the comments below! Or if you’re tackling another pesky PC buildissue, explore our other guides to become a true PC master.
Other Articles Related
How to Set Up Surround Sound for GamingElevate your gaming experience! Learn how to set up surround sound at home,from choosing the right speaker layout to calibrating audio settings for immersive gameplay.
How to Apply Thermal Paste Correctly
Step-by-step guide for correctly applying thermal paste on CPUs and GPUs. Learnoptimal methods, common mistakes, and best practices to maximize cooling and hardware performance.
How to Overclock Your GPU Safely
Maximize GPU performance safely! Learn step-by-step GPU overclocking, essentialtools, stability testing, and temperature monitoring to boost speedwithout damage.
How to Fix High GPU Usage
"Learn effective solutions to reduce high GPU usage, improveperformance, and prevent overheating. Step-by-step troubleshooting guide for gamers and creators."
How to Fix High CPU Usage While Gaming
Fix high CPU usage while gaming with these effective troubleshooting tips.Learn to optimize settings, update drivers, and boost gaming performance effortlessly.
How to Boost Wi‑Fi Signal for Gaming
Maximize your gaming performance with expert tips on how to boost Wi‑Fi signalstrength. Reduce lag, eliminate drops, and ensure a stable connection.
How to Reduce Lag in Cloud Gaming
Level up your cloud gaming experience! Learn expert tips to reduce lag,optimize streaming quality, and enjoy smoother gameplay with ouractionable guide.
How to Improve Cooling in Your PC
Learn how to boost airflow, optimize components, and reduce heat for acooler, faster, and more stable PC. Discover step-by-step coolingupgrade tips.
How to Clean Your PC for Better Performance
Learn easy steps to clean your PC for better performance—remove junk files,manage startup programs, update drivers, and optimize settings.
How to Overclock Your CPU Safely
Step-by-step guide for safely overclocking your CPU. Learn proper cooling, voltagetuning, and stability testing to boost performance without riskingdamage. Achieve a stable overclock with confidence.
How to Overclock Your GPU Safely
Maximize GPU performance safely! Learn step-by-step GPU overclocking, essentialtools, stability testing, and temperature monitoring to boost speedwithout damage.
How to Get All SpongeBob Cosmetics in Fortnite
guide to unlocking all SpongeBob cosmetics in Fortnite. Dive into tips, tricks, and strategies to enhance your gaming