All Items Tier List in Risk of Rain 2
Risk of Rain 2: All Items Tier List
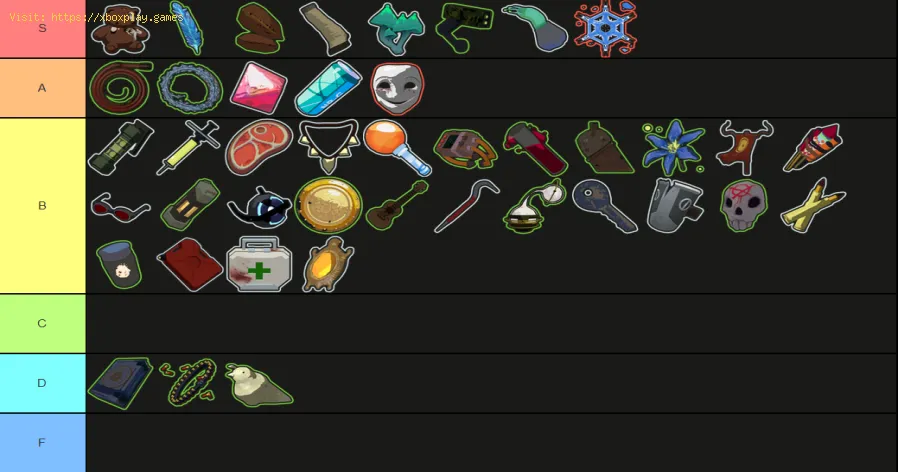
The RoR2 Item Power Matrix: S, A, and B Tiers
The following tier list prioritizes items based on their overall impact across most survivors and general gameplay situations. Items are ranked strictly within their own rarity pool (e.g., a White S-Tier item is the best Common item, not necessarily equal to a Red S-Tier item).White Items (Common): The Foundation of Every Run
White items are the bread and butter of your early game, and stacking the right ones immediately sets the stage for exponential scaling.
| Tier | Consistently Powerful (S-Tier) | Strong, More Situational (A-Tier) | Solid, Not Run-Defining (B-Tier) |
| Common | Lens-Maker’s Glasses (Crit chance), Soldier’s Syringe (Attack speed), Paul’s Goat Hoof (Movement speed), Topaz Brooch (Temporary barrier) | Focus Crystal (Close-range damage), Crowbar (Full-health damage), Armor-Piercing Rounds (Boss damage), Tri-Tip Dagger (Bleed chance), Monster Tooth (Minor healing) | Bundle of Fireworks, Rusted Key |
- Priority Focus: Stacking Lens-Maker’s Glasses to achieve 100% crit chance is the fastest way to multiply damage. Syringe and Hoof provide essential scaling in attack rate and mobility.
Green Items (Uncommon): Critical Synergy Pieces
Green items often provide the critical damage multipliers or utility effects that unlock powerful synergies.
| Tier | Consistently Powerful (S-Tier) | Strong, More Situational (A-Tier) | Solid, Not Run-Defining (B-Tier) |
| Uncommon | Ukulele (Chain lightning, AoE clear), Harvester’s Scythe (Consistent crit healing), Will-o’-the-Wisp (Massive explosion AoE on kill) | Razorwire (Damage around player), AtG Missile Mk. 1 (Major single-target burst) | — |
- Priority Focus: Ukulele combined with high attack speed becomes unmatched crowd clear. Harvester’s Scythe provides much-needed sustain for crit-based builds.
Red Items (Legendary): Game-Defining Power
Legendary items fundamentally change the rules of the run, providing immense, late-game scaling potential.
| Tier | Consistently Powerful (S-Tier) | Strong, More Situational (A-Tier) | Solid, Not Run-Defining (B-Tier) |
| Legendary | Shaped Glass (Damage doubled, health halved—risky scaling), Kjaro’s Band (Fire AoE), Runald’s Band (Ice slow/damage), Sentient Meat Hook (Massive hook/pull utility and damage) | Behemoth (Explosive hits), Rejuvenation Rack (Doubled healing), Backup Magazine (Extra equipment charge) | — |
- Priority Focus: The Bands are crucial damage multipliers, especially when combined with items that proc on-hit effects. Shaped Glass is the ultimate high-risk, high-reward power item.
Yellow Items (Boss): Boss-Slayer Synergy
Boss items are often the key to maximizing the effectiveness of other item stacks or granting unique, strategic advantages.
| Tier | Consistently Powerful (S-Tier) | Strong, More Situational (A-Tier) | Solid, Not Run-Defining (B-Tier) |
| Boss | 57 Leaf Clover (Massive luck boost for proc chains), Queens Gland (Summon helper), Charged Perforator (High single-target lightning burst) | H3AD-ST v2 (Mobility and dive damage) | — |
- Priority Focus: The 57 Leaf Clover is arguably the best item in the game, drastically increasing the chance of all proc effects (like Ukulele, Bands, and AtG Missile) activating, which leads to exponential damage scaling.
Blue Items (Lunar): Calculated Risk & Build Alteration
Lunar items are double-edged swords that can define unique builds but often come with a heavy cost. The S-Tier Lunar items are those where the benefit almost always outweighs the drawback.
| Tier | Consistently Powerful (S-Tier) | Strong, More Situational (A-Tier) | Solid, Not Run-Defining (B-Tier) |
| Lunar | Transcendence (Turns all health into shield), Gesture of the Drowned (Automates Equipment), Spinel Tonic (Massive buff, with potential debuff) | — | — |
- Priority Focus: Transcendence is essential for late-game survival, eliminating slow healing in favor of fast-recharging shields. Gesture of the Drowned enables continuous use of powerful Equipment like the Gnarled Woodsprite for healing.
Lower Tier Items: Situational Utility and Extreme Risk
Many items fall into the C, D, and F tiers. These are often highly situational, niche, or actively harmful if not used with extreme caution or on specific survivors. While most players should avoid these until late in a run, they can enable unique, if unreliable, strategies.
- Example: Purity (Lunar): Greatly reduces cooldowns but severely reduces your luck state, essentially shutting down all proc-based builds. Only useful for survivors relying solely on skill spam.
- Example: Stone Flux Pauldron (Legendary): Doubles your damage but halves your movement speed. This is a run-killer for most survivors due to the huge hit to mobility.
| Rarity | Niche, Conditional (C-Tier) | Weak or Actively Harmful (D/F-Tier) |
| Common | Bustling Fungus (Tier A/S for Engineer only) | Bison Steak |
| Uncommon | Ghor’s Tome (Monetary gain), Lost Seer’s Lenses (Instant kill chance) | Old War Stealthkit, Hunter’s Harpoon |
| Legendary | Wake of Vultures, Happiest Mask, Forgive Me Please, Resonance Disc | Stone Flux Pauldron, Frost Relic |
| Boss | Irradiant Pearl, Molten Perforator, Planula | Shared Design |
| Lunar | Visions of Heresy, Hooks of Heresy, Strides of Heresy, Encrusted Key | Purity, Brittle Crown, Benthic Bloom, Corpsebloom, Focus Converters, Eulogy Zero |
| DLC (Expansion) | Breaching Fin, Warped Echo | Chronic Expansion, Sonorous Whispers |
By focusing on the S-Tier and A-Tier items, especially the core multipliers like Lens-Maker’s Glasses, Soldier’s Syringe, Ukulele, and 57 Leaf Clover, you can quickly build the explosive synergies necessary to defeat the final boss and survive beyond the limits of the planet.

Other Articles Related
All Wandering CHEF Recipes in Risk of Rain 2all the Wandering CHEF recipes in Risk of Rain 2! Unlock unique dishes to enhance your gameplay and survive longer.
All Items Tier List in Risk of Rain 2
the ultimate Risk of Rain 2 items tier list! Explore rankings, strategies, and tips to enhance your gameplay and dominate every challenge.
How to Defeat the Secret Boss in Risk of Rain 2 Alloyed Collective
Struggling with the Alloyed Collective? Learn the best strategies, characterbuilds, and item loadouts to defeat this secret Risk of Rain 2 boss andclaim your victory.
How To Get Encrypted Cerebellum in Risk of Rain 2
Uncover the secrets of the Encrypted Cerebellum in Risk of Rain 2. Learn effective methods to acquire it and boost your character's abilities
How To Get Tougher Times in Risk of Rain 2
Learn how to acquire Tougher Times in Risk of Rain 2. Our expert tipswill help you boost your defenses and improve your chances of survival.
How To Get Brilliant Behemoth in Risk of Rain 2
Master the art of acquiring the Brilliant Behemoth in Risk of Rain 2.Explore our expert tips and strategies to enhance your gameplay
How To Reach Solus Heart in Risk of Rain 2
the ultimate guide to reaching the Solus Heart in Risk of Rain2. Unlock secrets, strategies, and tips to enhance your gameplay
How To Complete the Lost in Transit Challenge in Risk of Rain 2 Alloyed Collective
Struggling with the Lost in Transit challenge in Risk of Rain 2? This guideexplains exactly how to unlock the Alloyed Collective unit by completing the unique teleporter event without any allies dying.
How To Unlock the Drifter in Risk of Rain 2 Alloyed Collective
Learn the exact steps to unlock the Drifter in Risk of Rain 2. Our guidecovers finding the Alloyed Collective, completing the Vulture event, and claiming your new playable character.
How To Reach the Final Boss in Risk of Rain 2 Alloyed Collective
Learn the fastest route and strategies to reach the Final Boss, the AlloyedCollective, in Risk of Rain 2. Our guide covers loop requirements,celestial portal spawns, and how to activate the Bulwark's Ambry.
All Wishblossom Ranch Cooking Recipes in Disney Dreamlight Valley
all the Wishblossom Ranch cooking recipes in Disney Dreamlight Valley. Unleash your culinary creativity and enhance your gaming
How to Get Guardian Palm Skill in Where Winds Meet
Learn how to obtain the powerful Guardian Palm skill in Where Winds Meet.Discover the questline, requirements, and strategies to master thisdefensive martial arts ability and enhance your Wuxia adventure.
How to Unlock the Meridian Skill in Where Winds Meet
Learn how to unlock the powerful Meridian Skill in Where Winds Meet. Discover the questline, requirements, and best strategies to master thisessential ability and enhance your Wuxia gameplay.
How to Complete The Silent Assassin Quest in Where Winds Meet
Struggling with The Silent Assassin quest in Where Winds Meet? Our guide revealshow to eliminate your target undetected, find the key evidence, andachieve the coveted Silent Assassin rating.
How To Unlock The Goose Slayer Achievement in Where Winds Meet
Unlock the Goose Slayer achievement in Where Winds Meet with this guide.Discover the exact location of the aggressive goose and learn the combat strategy to defeat it and claim your reward.