
How to Find Ori’s Muznakan Carvings in Return to Moria
Discover the secrets of Moria with our step-by-step guide on How to Find Ori’s Muznakan Carvings in Return to Moria.
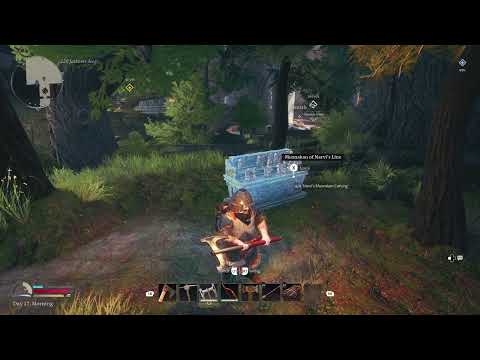
Welcome, adventurers of Moria! In this guide, we will embark on a thrilling quest to find Ori's Muznakan Carvings, a hidden treasure that awaits you in the depths of the ancient Dwarven mines. These carvings not only hold immense historical significance but also offer great rewards for those who have the courage to seek them out. So, grab your gear, sharpen your senses, and let's dive into the mesmerizing world of Moria to uncover these hidden gems!
Before we begin our journey, it's important to know where to start. The carvings are located in the starting mine area, just before reaching the Elven Quarter. This provides a perfect opportunity for players to explore this captivating landscape while on their quest. It's worth mentioning that the placement of these carvings is unique to each playthrough, as it is determined by your world's seed. So, no two adventurers will have the exact same experience!
As we set foot into the mine, our first destination is the Dwarven Ruins. This is where you'll find the first carving. Look for it before reaching the Elven Quarter, where the ruins tell stories of a glorious past. While I can't provide you with the exact location, keep an eye out for notable landmarks or hints that may guide you towards this hidden treasure. The thrill of the hunt lies in the exploration!
Master the art of How To Fast Travel in Return to Moria. This comprehensive guide will help you unlock secrets and fold time in Middle Earth!
How To Unlock the Steel Hammer Recipe in Return to Moria
Discover the secrets on How To Unlock the Steel Hammer Recipe in Return to Moria. Easy, step-by-step guide for epic gaming victories!
How to Find Ori’s Muznakan Carvings in Return to Moria
Discover the secrets of Moria with our step-by-step guide on How to Find Ori’s Muznakan Carvings in Return to Moria.
How to steal the Eyepatch from the museum in Return to Monkey Island
This time we return with a guide with the objective of explaining how to steal the Eyepatch from the museum in Return to Monkey Island.
Where to find all 100 Trivia Cards in Return to Monkey Island
Today we bring you a guide on Where to find the trivia book in Return to Monkey Island.
How to get the mop in Return to Monkey Island
The action in Return to Monkey Island does not stop, which will lead us to explain how to get the mop in Return to Monkey Island.
How to Get the Horse Armor in Return to Monkey Island
Today, we bring you a guide on How to get horse armor in Return to Monkey Island.
How to join LeChuck’s crew without being recognized in Return to Monkey Island
This time we return with a guide with the objective of explaining how to join LeChuck's crew in Return to Monkey Island.
How to free Otis from jail in Return to Monkey Island
With our guide, you will learn more about How to free Otis from jail in Return to Monkey Island.
How to unlock the Hint Book and get hints in Return to Monkey Island
Read on to learn where to find the Hint Book in Return to Monkey Island, because even though we're not kids, it's okay to leave early.
How to Stop Losing Money in Cities Skylines 2
How to Stop Losing Money in Cities Skylines 2! Discover effective strategies to stop financial losses in-game.
How to Grow City Population in Cities Skylines 2
How to Grow City Population in Cities Skylines 2! Expert tips and strategies for smart urban planning.
How to Take Screenshots in Cities Skylines 2
Master Cities Skylines 2 with our guide on How to Take Screenshots in Cities Skylines 2s. Capture your gaming achievements.
How to Remove Underground Pipes in Cities Skylines 2
Master the game with our expert tips on How to Remove Underground Pipes in Cities Skylines 2.
How To Get Distilled Fear in Diablo 4
Master the art of How To Get Distilled Fear in Diablo 4. Equip your character to conquer the darkest dungeons.
Welcome, adventurers of Moria! In this guide, we will embark on a thrilling quest to find Ori's Muznakan Carvings, a hidden treasure that awaits you in the depths of the ancient Dwarven mines. These carvings not only hold immense historical significance but also offer great rewards for those who have the courage to seek them out. So, grab your gear, sharpen your senses, and let's dive into the mesmerizing world of Moria to uncover these hidden gems!
How to Find Ori’s Muznakan Carvings in Return to Moria
Starting Point and General Information:
Before we begin our journey, it's important to know where to start. The carvings are located in the starting mine area, just before reaching the Elven Quarter. This provides a perfect opportunity for players to explore this captivating landscape while on their quest. It's worth mentioning that the placement of these carvings is unique to each playthrough, as it is determined by your world's seed. So, no two adventurers will have the exact same experience!
First Carving: Dwarven Ruins
As we set foot into the mine, our first destination is the Dwarven Ruins. This is where you'll find the first carving. Look for it before reaching the Elven Quarter, where the ruins tell stories of a glorious past. While I can't provide you with the exact location, keep an eye out for notable landmarks or hints that may guide you towards this hidden treasure. The thrill of the hunt lies in the exploration!
Second Carving: Ruined House near a River
Our next stop is a ruined house near a river, nestled next to a Dwarven area with flower beds. This picturesque setting hides the second carving, waiting to be discovered. Look for the signs of a once-lived-in house, now overshadowed by time. Additional details and clues may be scattered around, leading you closer to your goal. Be observant and let your curiosity guide you!
Third Carving: Near the Swirling Shadows Room
Prepare yourself for a mysterious encounter as we approach the swirling shadows room, where the third carving awaits. This area, marked by ethereal shadows dancing on the ground, presents a unique challenge. Navigating these shadows may require careful observation and strategic planning. Take your time, study the patterns, and conquer this room to claim your prize!
Fourth Carving: Next to an Ore Pile in a Larger Hallway
Venturing deeper into the mine, we find ourselves in a larger hallway, where the fourth carving is discreetly placed next to an ore pile. This hallway may be filled with awe-inspiring architecture and grandeur. Keep an eye out for distinguishing features or landmarks nearby, as they can serve as valuable clues to uncover this hidden gem. Remember, fortune favors the observant!
Fifth and Final Carving: Near the Start of the First Camp
Our journey nears its end as we approach the start of the first camp. Perched atop a wall, the fifth and final carving awaits, ready to be claimed by the most intrepid adventurers. Keep your eyes peeled for any contextual information or visual cues that may aid in spotting this elusive treasure. Once you've secured it, take a moment to bask in the glory of your achievement!
Congratulations, brave explorers! You have successfully found all five of Ori's Muznakan Carvings, delving deep into the heart of Moria and unraveling its secrets. But the adventure doesn't end here. Remember to return to your original starting point to complete this quest and claim your rewards. Turning in the carvings will not only provide you with Gold Coins, Iron Ingots, and a Sapphire but also grant you access to exclusive crafting schematics for a Trapper's Hat and the coveted Heirloom Shield. These rewards are a testament to your dedication and perseverance.
Platform(s): Windows PC, macOS, Nintendo Switch
Genre(s): Graphic adventure
Developer(s): Terrible Toybox
Publisher(s): Devolver Digital
Release date: 19 September 2022
Mode: Single-player
Age rating (PEGI): 12+
Other Articles Related
How To Fast Travel in Return to MoriaMaster the art of How To Fast Travel in Return to Moria. This comprehensive guide will help you unlock secrets and fold time in Middle Earth!
How To Unlock the Steel Hammer Recipe in Return to Moria
Discover the secrets on How To Unlock the Steel Hammer Recipe in Return to Moria. Easy, step-by-step guide for epic gaming victories!
How to Find Ori’s Muznakan Carvings in Return to Moria
Discover the secrets of Moria with our step-by-step guide on How to Find Ori’s Muznakan Carvings in Return to Moria.
How to steal the Eyepatch from the museum in Return to Monkey Island
This time we return with a guide with the objective of explaining how to steal the Eyepatch from the museum in Return to Monkey Island.
Where to find all 100 Trivia Cards in Return to Monkey Island
Today we bring you a guide on Where to find the trivia book in Return to Monkey Island.
How to get the mop in Return to Monkey Island
The action in Return to Monkey Island does not stop, which will lead us to explain how to get the mop in Return to Monkey Island.
How to Get the Horse Armor in Return to Monkey Island
Today, we bring you a guide on How to get horse armor in Return to Monkey Island.
How to join LeChuck’s crew without being recognized in Return to Monkey Island
This time we return with a guide with the objective of explaining how to join LeChuck's crew in Return to Monkey Island.
How to free Otis from jail in Return to Monkey Island
With our guide, you will learn more about How to free Otis from jail in Return to Monkey Island.
How to unlock the Hint Book and get hints in Return to Monkey Island
Read on to learn where to find the Hint Book in Return to Monkey Island, because even though we're not kids, it's okay to leave early.
How to Stop Losing Money in Cities Skylines 2
How to Stop Losing Money in Cities Skylines 2! Discover effective strategies to stop financial losses in-game.
How to Grow City Population in Cities Skylines 2
How to Grow City Population in Cities Skylines 2! Expert tips and strategies for smart urban planning.
How to Take Screenshots in Cities Skylines 2
Master Cities Skylines 2 with our guide on How to Take Screenshots in Cities Skylines 2s. Capture your gaming achievements.
How to Remove Underground Pipes in Cities Skylines 2
Master the game with our expert tips on How to Remove Underground Pipes in Cities Skylines 2.
How To Get Distilled Fear in Diablo 4
Master the art of How To Get Distilled Fear in Diablo 4. Equip your character to conquer the darkest dungeons.