
How to Open The Castle Leyawiin Basement Secret Passage in Oblivion Remastered
The Ahdarji's Heirloom quest in The Elder Scrolls IV: Oblivion Remastered plunges you into a web of theft, deception, and clandestine maneuvers as you strive to recover a stolen ring. From navigating the hidden passages of Castle Leyawiin under the cover of darkness to unraveling Amusei's duplicitous actions, this comprehensive guide will illuminate the various choices and challenges you'll encounter, providing a clear path to completing the quest and claiming your well-deserved reward.
Oblivion Remastered: The Castle Leyawiin Basement Secret Passage
Initiating the Search: Speaking with Doyen S'Krivva
Your journey begins in the bustling city of Bravil. Seek out Doyen S'Krivva, a key figure within the local Thieves Guild. Engaging in conversation with her will reveal the plight of Ahdarji, a former guild member now widowed, who has fallen victim to the theft of a cherished ring. While the ring itself holds no direct significance to the guild or its members, S'Krivva, ever mindful of the guild's reputation and integrity, tasks you with its retrieval.Locating the Grieving Widow: Finding and Speaking to Ahdarji
Your next objective is to locate Ahdarji herself in the city of Leyawiin. To pinpoint her whereabouts, you can inquire with a beggar within Leyawiin. Be aware that the initial information you receive might be slightly misleading, as they may incorrectly state that she resides on the west side of town when her actual residence is on the east. Ahdarji maintains a regular routine, often frequenting the Three Sisters' Inn in the evening and taking her midday meal at the Five Claws Lodge. By visiting these locations, you should be able to track her down.Upon finally meeting Ahdarji, she will reveal the identity of the thief: none other than Amusei (a familiar face for those who have encountered him previously). Consumed by grief and a desire for vengeance, Ahdarji initially demands that you end Amusei's life. However, due to his essential role in a later questline, this course of action is not a viable option. Understanding this limitation, Ahdarji revises her request, asking instead that you make Amusei suffer for his transgression.Important Preparation: If you intend to experience all facets of this quest, ensure you possess at least one lockpick, as you will eventually need to part with it. Throughout your infiltration of Castle Leyawiin, you will encounter multiple locked obstacles, including doors, a chest, and a jewelry box. You can overcome these using your preferred methods: the skillful application of lockpicks, the strategic use of unlocking spells, or the acquisition of up to five different keys: one for the castle dungeon, one for the secret passage, one for the interior castle doors, one for the Countess's bedroom, and one for the jewelry box.Unraveling the Thief's Fate: Finding and Confronting Amusei
To locate the elusive Amusei, youwill once again need to seek the assistance of a beggar. By offering asmall sum of gold for information, you will learn that Amusei's attemptto scam Alessia Caro, the Countess of Leyawiin, hasresulted in his arrest. He is currently confined within the depths ofthe castle dungeon. Gaining access to Amusei requires navigating thecastle's security. You can either bribe a guard to permit a prisoner visit (the standard rate is usually sufficient), skillfully pick the lock to the dungeon entrance, or attempt to steal the jailor's key.
Once inside the dimly lit confines of the dungeon, Amusei will only be willing to converse if you offer him a lockpick as a bribe. Upon receiving this offering, he will confess to stealingthe ring, admitting that it originally belonged to the Countess. Hisill-conceived plan involved attempting to ransom the heirloom back toAhdarji for his own gain. He will reveal that the ring is currently inthe possession of the Countess.
After your encounter with the incarcerated Amusei, return to Ahdarji andrelay the information about his attempted ransom. This revelation willprompt a significant shift in Ahdarji's intentions. Driven by her desire to reclaim the ring for herself, she will offer you double your initial reward if you agree to steal it directly from the Countess.
Gathering Crucial Intelligence: Speaking with Hlidara Mothril
To gather the necessary intelligence for your infiltration of CastleLeyawiin, you will need to consult another beggar. They will suggestseeking out Hlidara Mothril, the Countess's trustedhandmaiden. They may also mention the existence of a hidden torturechamber within the castle, rumored to have been used on Argonianprisoners.
Engaging in conversation with Hlidara requires building rapport. At a disposition of 60 or higher, she will reveal the Countess's daily schedule, providingvaluable insights into her movements. Furthermore, she will disclosethat the Countess is typically away from the castle between the 15th and 17th of each month. By increasing her disposition to 70 or higher, Hlidara will share crucial details about the ring'swhereabouts. She will inform you that the Countess only removes the ring when bathing or sleeping, storing it securely within a jewelry boxlocated beside her bed. Most importantly, she will reveal the existenceof a secret passage that connects the aforementionedtorture chamber to the Countess's private quarters. This hidden routewill be instrumental in your stealthy endeavor.
Infiltrating the Countess's Chambers: A Midnight Incursion
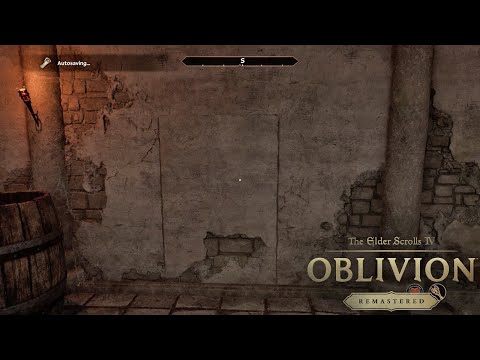
The optimal time for your infiltration of the Countess's private quarters is around 1:00 a.m., when the castle is typically at its quietest. Make your way to the castle's basement. Your objective here is to locate an open barrel with a discernible lever inside. Activating this lever will reveal the entrance to the secretpassage mentioned by Hlidara. Proceed through this newly revealedpassage, and you will soon encounter a second hidden lever. Pulling this lever will grant you further access.
As you progress through the secret passage, you will encounter a locked door. You will need to either pick this lock or acquire the corresponding key, which can potentially be stolen from either the Count or Caelia Draconis. Beyond this door, exercise caution as you will need to sneak past a patrolling guard. Successfully evading their vigilance is crucial for maintaining your stealth.
You now have two potential routes to access the Countess's private chamber. You can either pick the lock on the private chamber door directly or attempt entry through the County Hall. However, be aware that the County Hall route typically involvesnavigating past a greater number of guards, increasing the risk ofdetection.
Once inside the Countess's bedroom, your primary target is the jewelry box containing the stolen ring. You can either unlock the jewelry box using your lockpicking skills or attempt to steal the key from the Countess herself, if she is present and asleep. After successfully opening the jewelry box, retrieve Ahdarji's Heirloom. While you are in the Countess's private quarters, it is also worthseizing any additional valuable loot you may find, such as the lettertitled "Divining the Elder Scrolls," which is worth a respectable 50 gold.
With the ring and any additional loot secured, carefully retrace your steps, exiting the Countess's chambers via the same route you used for entry.Exercise extreme caution to avoid detection by any patrolling guards asyou make your escape.
Completing the Task: Returning the Heirloom and Claiming Your Reward
With Ahdarji's Heirloom now in your possession, return to Ahdarji in Leyawiin. When you present her with the ring, the reward you receive will depend on the information you previously shared with her regarding Amusei's actions. If you informed Ahdarji that Amusei attempted to ransom the ring, she will reward you with 200 gold. However, if you withheld this information, your reward will be reduced to 100 gold.
Finally, make your way back to Doyen S'Krivva in Bravil to report the successful completion of your assignment. Foryour efforts in retrieving Ahdarji's Heirloom and upholding theintegrity of the Thieves Guild, S'Krivva will bestow upon you a rewardof 200 gold, grant you a promotion to the rank of Prowler within the guild, and present you with your next assignment, further immersing you in the shadowy world of the Thieves Guild.
Keywords: OblivionRemastered, Ahdarji's Heirloom, Thieves Guild quest, stealth guide,Leyawiin, Amusei, Countess Alessia Caro, secret passage, lockpicking,quest walkthrough, rewards
Other Articles Related
Where to Find Sorcerer’s Ring in Oblivion RemasteredDiscover the location of the Sorcerer’s Ring in Oblivion Remastered. Unlock powerful abilities with our detailed guide!
How To Get Staff of Flame in Oblivion Remastered
Discover the ultimate guide on how to obtain the Staff of Flame in Oblivion Remastered.
How To Cure Sickly Bernice’s Illness in Oblivion Remastered
Help Sickly Bernice in Oblivion Remastered as you embark on a quest to cure her illness. Discover secrets and restore her health
How to Get Spell Tomes in Oblivion Remastered
Discover the ultimate guide on how to get spell tomes in Oblivion Remastered.
How to get Sword of Crusador in Oblivion Remastered
Discover how to obtain the powerful Sword of Crusador in Oblivion Remastered. Unlock secrets and enhance your gameplay!
How To Buy Conjuration Spells in Oblivion Remastered
Discover how to buy Conjuration spells in Oblivion Remastered. Unlockpowerful magic and enhance your gameplay
How To Get Oghma Infinium in Oblivion Remastered
Discover how to obtain the Oghma Infinium in Oblivion Remastered. Unlock powerful knowledge and enhance your gameplay
How to Beat the Three Argonian Prisoners in Oblivion Remastered
Master the art of defeating the Three Argonian Prisoners in Oblivion Remastered with our expert tips and strategies.
All Doomstones Locations & Effects in Oblivion Remastered
Discover all Doomstone locations and their effects in Oblivion Remastered. Enhance your gameplay with our guide!
How To Get The Madness Armor in Oblivion Remastered
Discover how to obtain the Madness Armor in Oblivion Remastered with our comprehensive guide. Unlock powerful gear
How To Get Fin Gleam in Oblivion Remastered
Discover the ultimate guide on how to get Fin Gleam in Oblivion Remastered. Unlock secrets
Razer Blade 16 (2025) review: ultra settings on an ultra-thin laptop
Discover the Razer Blade 16 (2025) review, showcasing ultra settings on an ultra-thin laptop.
HP ZBook Power 16 G11 A Review
Discover the HP ZBook Power 16 G11 A in our in-depth review. Uncover its performance
BenQ GP520 Review: Uncovering Features & Performance
Discover the BenQ GP520 in our detailed review, exploring its standout features and performance.
How to Make Gold Fast in Oblivion Remastered
Discover effective strategies to make gold quickly in Oblivion Remastered.