
How to defend the antenna in Warhammer 40K Space Marine 2
With our help you will see that knowing How to defend the antenna in Warhammer 40K Space Marine 2 is easier than you think.
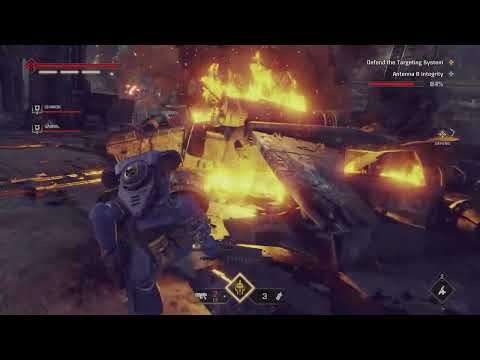
The defense of the antenna objective in Space Marine 2's inaugural campaign mission presents a formidable challenge. The unrelenting waves of Nids, coupled with the relentless assault of Gargoyles targeting the cannon antenna, make it a particularly daunting task, especially when playing on higher difficulty settings. Successful completion of this objective necessitates careful resource management and strategic decision-making.
To overcome this obstacle, players must prioritize their resource allocation, ensuring that they have sufficient ammunition, health, and power for their equipment. Additionally, it's crucial to identify and capitalize on opportunities to counterattack the Gargoyles perched on the antenna. These flying creatures can be a significant threat, and eliminating them can alleviate pressure on the objective and reduce the overall difficulty of the encounter.
Furthermore, effective use of cover is essential for survival. Seek out strategic positions that provide protection from enemy fire while allowing for accurate shots. Utilize the environment to your advantage, taking cover behind structures or utilizing natural obstacles to avoid incoming attacks.
Ultimately, the defense of the antenna objective requires a combination of skill, strategy, and perseverance. By carefully managing resources, seizing opportunities for counterattacks, and utilizing cover effectively, players can overcome this formidable challenge and progress further in the campaign.
Unlock the 200 Accolades achievement in Warhammer 40k: Space Marine 2 forfree. This guide reveals the best strategies & mission types toefficiently earn all required Accolades through gameplay.
How to get Algari Tokens of Merit in WoW The War Within
Today we bring you an explanatory guide on How to get Algari Tokens of Merit in WoW The War Within.
How to defend the antenna in Warhammer 40K Space Marine 2
With our help you will see that knowing How to defend the antenna in Warhammer 40K Space Marine 2 is easier than you think.
How to Fix Warhammer 40K Space Marine 2 Audio Not Working
Our guide aims to explain to you all about How to Fix Warhammer 40K Space Marine 2 Audio Not Working.
How to Find All Operations Mode Dataslate in Warhammer 40K Space Marine 2
Welcome to our guide on How to Find All Operations Mode Dataslate in Warhammer 40K Space Marine 2 in a specific and detailed way.
How to Level Up Classes Fast in Warhammer 40K Space Marine 2
Today we bring you an explanatory guide on How to Level Up Classes Fast in Warhammer 40K Space Marine 2.
How To Land Gun Strikes in Warhammer 40K Space Marine 2
With our explanatory guide you will see that knowing How To Land Gun Strikes in Warhammer 40K Space Marine 2 is easier than you think.
How to Get Requisition Points in Warhammer 40K Space Marine 2
Welcome to our detailed and specific guide on How to Get Requisition Points in Warhammer 40K Space Marine 2.
How To Use The Grenade Launcher in Warhammer 40K Space Marine 2
Today we bring you an explanatory guide on How To Use The Grenade Launcher in Warhammer 40K Space Marine 2.
How to delete your custom armor set in Warhammer 40K Space Marine 2
Welcome to our guide on How to delete your custom armor set in Warhammer 40K Space Marine 2 in a specific and detailed way.
How to Find Glitchbirds in The Plucky Squire
We welcome you to our guide on How to Find Glitchbirds in The Plucky Squire in a specific and detailed way.
How to get Prefabs in Frostpunk 2
Today we bring you an explanatory guide on How to get Prefabs in Frostpunk 2 with precise details.
How to get more Frostland Teams in Frostpunk 2
This time we return with a guide with the objective of explaining to you How to get more Frostland Teams in Frostpunk 2.
How to reduce Squalor in Frostpunk 2
Discover How to reduce Squalor in Frostpunk 2 with this excellent and detailed explanatory guide.
How to use the Orbital 380MM HE Barrage to maximize kills in Helldivers 2
We invite you to discover How to use the Orbital 380MM HE Barrage to maximize kills in Helldivers 2, a new task in this incredible game.
The defense of the antenna objective in Space Marine 2's inaugural campaign mission presents a formidable challenge. The unrelenting waves of Nids, coupled with the relentless assault of Gargoyles targeting the cannon antenna, make it a particularly daunting task, especially when playing on higher difficulty settings. Successful completion of this objective necessitates careful resource management and strategic decision-making.
To overcome this obstacle, players must prioritize their resource allocation, ensuring that they have sufficient ammunition, health, and power for their equipment. Additionally, it's crucial to identify and capitalize on opportunities to counterattack the Gargoyles perched on the antenna. These flying creatures can be a significant threat, and eliminating them can alleviate pressure on the objective and reduce the overall difficulty of the encounter.
Furthermore, effective use of cover is essential for survival. Seek out strategic positions that provide protection from enemy fire while allowing for accurate shots. Utilize the environment to your advantage, taking cover behind structures or utilizing natural obstacles to avoid incoming attacks.
Ultimately, the defense of the antenna objective requires a combination of skill, strategy, and perseverance. By carefully managing resources, seizing opportunities for counterattacks, and utilizing cover effectively, players can overcome this formidable challenge and progress further in the campaign.
How to defend the antenna in Warhammer 40K Space Marine 2
To effectively defend the antenna against the overwhelming swarms of gargoyles, a combination of strategy, equipment, and environmental awareness is essential.
Pre-Battle Preparation:
- Weapon Acquisition: Before ascending to the antenna floor, explore the lower platform for suitable weaponry. The Auto Bolt Rifle found near the elevator is a reliable choice for rapid-fire capabilities.
- Resource Gathering: Collect medical supplies, grenades, and ammunition to ensure you're well-equipped for the challenges ahead.
Defensive Strategies:
- Ranged Attacks: Utilize your chosen weapon, such as the bolt rifle, to engage gargoyles from a distance. Focus on targeting their weak points for maximum damage.
- Explosive Tactics: Employ Krag grenades to destroy the lights within swarms, making them more vulnerable to attack. Frag grenades can also be used to create temporary clearings and thin the horde.
- Environmental Hazards: Take advantage of the environment by detonating plasma batteries to inflict area damage and reduce the number of enemies.
Enemy Analysis:
- Gargoyles: These smaller enemies are vulnerable to ranged attacks. Prioritize their elimination to prevent them from overwhelming your position.
- Tyranid Warriors: These larger, more formidable opponents require a different approach. Use the plasma pistol in its charged state to deal area damage and weaken them before engaging in close combat.
Tactical Considerations:
- Positioning: Find a strategic location that offers a clear field of fire and minimizes exposure to enemy attacks.
- Crowd Control: Use your grenades and the plasma pistol's charged shot to control the flow of enemies and prevent them from overwhelming your position.
- Resource Management: Conserve ammunition and medical supplies for critical moments. Avoid wasting resources on unnecessary engagements.
Planning Ahead and Weapon Choice
To effectively navigate this challenging section, it's crucial to plan ahead and acquire specific weapons early on. The Bolt Rifle with Grenade Launcher and the Melta Rifle are two particularly useful options.
After the 15-minute cutscene, you'll be equipped with a Bolt Rifle with Grenade Launcher. This versatile weapon excels at eliminating both individual gargoyles and large hordes. The added bolt magazine is especially helpful against swarms, providing a steady supply of ammunition for sustained fire.
Alternatively, the Melta Rifle is a powerful tool for clearing hordes. You can find one as you cross the bridge. If you manage to get close to the Antenna, you can use the Melta Rifle to eliminate a significant portion of the Gargoyles at once, dealing massive damage and clearing a path. However, be sure to carry a Bolt Pistol as a secondary weapon to handle smaller enemies that may evade the Melta Rifle's powerful blast.
If you're struggling to overcome the challenges of this section, consider teaming up with a cooperative partner. Human allies are significantly more effective than AI companions, offering better coordination, communication, and strategic decision-making. They can assist with dealing with hordes, gargoyles, and elites, while also making better use of grenades to clear paths and create opportunities for your team.
This is all there is to consider regarding How to defend the antenna in Warhammer 40K Space Marine 2, it will be enough to apply the instructions in this guide to achieve it and continue improving our fun in this great game.
Platform(s): PlayStation 4, PlayStation 5, Xbox One, Xbox Series X/S, PC
Genre(s): first-person shooter
Developer(s): Saber Interactive
Publisher(s): Focus Entertainment
Engine: Unreal Engine 4
Mode: Single-player, multiplayer
Age rating (PEGI): +18
Other Articles Related
How to get 200 Accolades in Warhammer 40k Space Marine 2 for freeUnlock the 200 Accolades achievement in Warhammer 40k: Space Marine 2 forfree. This guide reveals the best strategies & mission types toefficiently earn all required Accolades through gameplay.
How to get Algari Tokens of Merit in WoW The War Within
Today we bring you an explanatory guide on How to get Algari Tokens of Merit in WoW The War Within.
How to defend the antenna in Warhammer 40K Space Marine 2
With our help you will see that knowing How to defend the antenna in Warhammer 40K Space Marine 2 is easier than you think.
How to Fix Warhammer 40K Space Marine 2 Audio Not Working
Our guide aims to explain to you all about How to Fix Warhammer 40K Space Marine 2 Audio Not Working.
How to Find All Operations Mode Dataslate in Warhammer 40K Space Marine 2
Welcome to our guide on How to Find All Operations Mode Dataslate in Warhammer 40K Space Marine 2 in a specific and detailed way.
How to Level Up Classes Fast in Warhammer 40K Space Marine 2
Today we bring you an explanatory guide on How to Level Up Classes Fast in Warhammer 40K Space Marine 2.
How To Land Gun Strikes in Warhammer 40K Space Marine 2
With our explanatory guide you will see that knowing How To Land Gun Strikes in Warhammer 40K Space Marine 2 is easier than you think.
How to Get Requisition Points in Warhammer 40K Space Marine 2
Welcome to our detailed and specific guide on How to Get Requisition Points in Warhammer 40K Space Marine 2.
How To Use The Grenade Launcher in Warhammer 40K Space Marine 2
Today we bring you an explanatory guide on How To Use The Grenade Launcher in Warhammer 40K Space Marine 2.
How to delete your custom armor set in Warhammer 40K Space Marine 2
Welcome to our guide on How to delete your custom armor set in Warhammer 40K Space Marine 2 in a specific and detailed way.
How to Find Glitchbirds in The Plucky Squire
We welcome you to our guide on How to Find Glitchbirds in The Plucky Squire in a specific and detailed way.
How to get Prefabs in Frostpunk 2
Today we bring you an explanatory guide on How to get Prefabs in Frostpunk 2 with precise details.
How to get more Frostland Teams in Frostpunk 2
This time we return with a guide with the objective of explaining to you How to get more Frostland Teams in Frostpunk 2.
How to reduce Squalor in Frostpunk 2
Discover How to reduce Squalor in Frostpunk 2 with this excellent and detailed explanatory guide.
How to use the Orbital 380MM HE Barrage to maximize kills in Helldivers 2
We invite you to discover How to use the Orbital 380MM HE Barrage to maximize kills in Helldivers 2, a new task in this incredible game.