
How to complete Behind Seven Seals mission in Stalker 2
We have made a practical guide to explain How to Complete Behind Seven Seals Mission in Stalker 2.
Playing as "Behind Seven Seals" is the second objective in Stalker 2. In the previous quest, Solder, an important character in the main plot, gave you coordinates and let you enter the Exclusion Zone. In order to restore the strange abilities of a worn relic, he told you to position your scanner in a certain spot. But it was all a ruse by Solder; some hostile troops took the scanner and rendered you unconscious.
In the Behind Seven Seals mission, your primary objective is to locate Solder and confront him. Well, this sets the setting for that purpose.
When you come to, Richter appears in a cutscene and throws you a bolt, an important item. You are surrounded by an anomaly field, which, if touched, can be lethal. Throwing the bolt into the anomaly will neutralize it for a while, long enough to cross.
Next, Richter sends you to Zalissya, where you are supposed to speak with Warlock, a bartender with interesting information. You can do so after completing another quest entitled A Tough Awakening.
Master the shadows of the Zone. Our guide reveals all Night Vision Gogglelocations in Stalker 2, helping you survive the deadly darkness and gain a crucial tactical edge.
How To Put Away Weapons in Stalker Legends Of The Zone Trilogy
Dive into the thrilling world of Stalker Legends Of The Zone Trilogy: Put Away Weapons. Experience intense gameplay
How To Heal & Stop Bleeding In Stalker Legends Of The Zone
Discover Stalker Legends Of The Zone: Heal wounds and stop bleeding in this thrilling survival game. Join the adventure now!
How To Fast Travel In Stalker Legends Of The Zone
Discover how to fast travel in STALKER Legends of the Zone with our comprehensive guide. Enhance your gameplay
Where to Find Artifacts with the Detector in STALKER Legends of the Zone
Discover the thrilling world of STALKER Legends of the Zone and uncover powerful artifacts using your detector.
All Stash Locations In Swamps in Stalker 2 Heart Of Chornobyl
Discover all stash locations in the swamps of Stalker 2: Heart Of Chornobyl.
How to Fix Stalker 2 Not Using GPU and Crashing at 100% CPU Usage
Stalker 2 not using your GPU and maxing out your CPU? Learn how to fix performance issues and crashes with our troubleshooting guide.
How to Open River Port Locked Door In Pripyat in Stalker 2
On this occasion we return with a guide with the objective of explaining to you How to Open River Port Locked Door In Pripyat in Stalker 2.
How To Unlock CSC Building Basement Steel Door in Pripyat in Stalker 2
Our guide today is intended to explain to you everything about How To Unlock CSC Building Basement Steel Door in Pripyat in Stalker 2.
How To Get The Unique Texan Shotgun in Stalker 2
We invite you to discover How To Get The Unique Texan Shotgun in Stalker 2 with this detailed guide that we offer here.
How to get the Weird Water artifact in Stalker 2
Today we bring you an explanatory guide on How to get the Weird Water artifact in Stalker 2 so that you can have this important element.
How to open the Waste Processing Center stash in Stalker 2
Today we bring you an explanatory guide on How to open the Waste Processing Center stash in Stalker 2 so you can overcome this part of the game.
How to get the Railway Maintenance Facility code in Stalker 2
Today we bring you an explanatory guide with all the information you need to know about How to get the Railway Maintenance Facility code in Stalker 2.
How to complete Dead Frequency mission in Stalker 2
We have made a detailed guide to explain How to Complete Dead Frequency Mission in Stalker 2.
How to Change Servers in Destiny 2
Today we bring you an explanatory guide on How to Change Servers in Destiny 2 so that you can carry out this process without any problems.
Playing as "Behind Seven Seals" is the second objective in Stalker 2. In the previous quest, Solder, an important character in the main plot, gave you coordinates and let you enter the Exclusion Zone. In order to restore the strange abilities of a worn relic, he told you to position your scanner in a certain spot. But it was all a ruse by Solder; some hostile troops took the scanner and rendered you unconscious.
In the Behind Seven Seals mission, your primary objective is to locate Solder and confront him. Well, this sets the setting for that purpose.
How to complete Behind Seven Seals mission in Stalker 2?
Guideline for the "Behind Seven Seals" assignment in Stalker 2.Your choices in Stalker 2's Behind Seven Seals assignment will have major effects on the storyline. There are four alternative endings in this game, and your choice dictates how the story goes.When you come to, Richter appears in a cutscene and throws you a bolt, an important item. You are surrounded by an anomaly field, which, if touched, can be lethal. Throwing the bolt into the anomaly will neutralize it for a while, long enough to cross.
Next, Richter sends you to Zalissya, where you are supposed to speak with Warlock, a bartender with interesting information. You can do so after completing another quest entitled A Tough Awakening.
Find out what the barman, Warlock, has to say.
Approach the settlement of Zalissya and keep your weapon holstered. The Behind Seven Seals quest will officially be triggered when you approach the house that is highlighted by a yellow exclamation mark. Prepare for a pretty long cinematic scene:.
Warlock'll give you two leads at the end of the scene: Zotov of the Ward, and Gaffer, a guide who made his name helping out beginners. Which one you track Solder down with is determined now:
Speak to Zotov and Gaffer.
Zotov and Gaffer are begging you to help them retrieve sensors that a guy named Squint has stolen. A Needle in a Haystack is another primary quest that is activated when you are brought to a warehouse to start your mission.
Complete the quest: A Needle in a Haystack.
Find Squint is the primary quest of this mission.
- Head to Warehouse: Once you arrive, some wild dogs will assault you. Eliminate them, then enter the complex.
- Inside the marked building, find said bandit in the room on the second floor with the character playing guitar. Have a chat with him. Encourage him to tell where Squint is. To do this, pay 1,500 units of in-game currency for information.
- Find Squint: Squint can be found in a windmill made of wood which is situated near Farstead. Be extremely cautious while getting inside; the place is booby-trapped. If injured, get well soon.
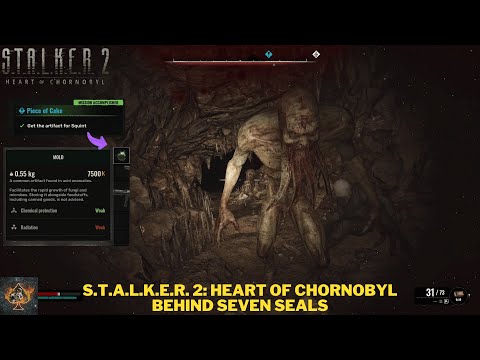
- If you speak to Squint, he will tell you that he has pilfered some sensors. In return, he wants an artifact; this will start the Easy as Cake side quest.
Complete Side Quest: Easy as Cake
Launch your notebook and choose "Piece of Cake" as your tracking method.
Locate the relic
- Find the cave entrance in the center room of the home that has been marked.
- A Bloodsucker, a swift and cloaked foe, awaits you within. If you run toward the river, you can see its footprints and defeat it more easily.
- Proceed to the acid puddles that are colored green. Use your Echo Detector and trace the sound to the artifact.
Head back to squint
After collecting the artifact, head back to Squint in order to obtain the Ward sensors. This will complete Piece of Cake and advance you on Behind Seven Seals, the major quest.
Ward Sensors Award Richter or Zotov the Ward Sensors.
Both options show where Solder is, but this one changes how the story develops.
If you want an easier way, choose Zotov. After he returns the sensors, Zotov learns from Solder's confession that he is an IPSF technician stationed at the Sphere—a place where anomalies are supposedly mapped. He also mentions a reliable insider who can assist you in covertly infiltrating the Sphere.
Get into the Sphere
Head to the location of the Sphere. Outside is the insider who owes Zotov a favor. Find a way inside, either forcefully or wait for an opening and go in quietly. Expect a number of armed soldiers to be there, so you should be prepared.
During the Behind Seven Seals quest, Zotov's insider can help you sneak into the Sphere. Image by GSC Game World || YouTube/@WoW Quests
When inside, go left. You'll notice a big building with a sphere on top. On the left side, you can find a gap in the wall. Move through it. Turn left and head down the hall off the first door. When you reach the hallway door, take an immediate right to find a stairwell heading down.
Go down to your knees and follow the path to the other staircase. At the end, you should find a door. Enter, clear out the troops that are set up, and head straight through. Turn left at the first locked door and head down the hallway. Then, head to the first closed door on the right and open it. Solder is inside.
As you approach him, a cinematic reveals that a confrontation with Solder is in order. It seems that Nestor, the owner of the company selling scanners, has Solder as a pawn in a larger scheme. Solder reveals that Nestor is positioned north of Zalissya.
After this sequence, Solder will launch another assault on you. Now is the time to decide whether to kill him or just knock him out. The storyline could be impacted in the future by this choice.
Depart from the Sphere
After the fight is over, head back to the starting point and leave the Sphere area. Call Zotov en route and inform him that Solder is no more than a pawn for Nestor. Zotov instructs you to meet his soldiers at a checkpoint in the west.
Reach the checkpoint by going to the little pontoon bridge. You have to cross it in order to leave the Lesser Zone, which is your last objective. The Behind Seven Seals quest in Stalker 2 will now be complete.
We hope that the unormation contributed about How to Complete Behind Seven Seals Mission in Stalker 2, be useful and take advantage of the game.
Platform(s): Windows PC, Xbox Series X/S
Genre(s): First-person shooter, survival horror
Developer(s): GSC Game World
Publisher(s): GSC Game World
Engine: Unreal Engine 5
Release date: 20 November 2024
Mode: Single-player, multiplayer
Age rating (PEGI): +18
Other Articles Related
How to Find All Night Vision Goggles in Stalker 2Master the shadows of the Zone. Our guide reveals all Night Vision Gogglelocations in Stalker 2, helping you survive the deadly darkness and gain a crucial tactical edge.
How To Put Away Weapons in Stalker Legends Of The Zone Trilogy
Dive into the thrilling world of Stalker Legends Of The Zone Trilogy: Put Away Weapons. Experience intense gameplay
How To Heal & Stop Bleeding In Stalker Legends Of The Zone
Discover Stalker Legends Of The Zone: Heal wounds and stop bleeding in this thrilling survival game. Join the adventure now!
How To Fast Travel In Stalker Legends Of The Zone
Discover how to fast travel in STALKER Legends of the Zone with our comprehensive guide. Enhance your gameplay
Where to Find Artifacts with the Detector in STALKER Legends of the Zone
Discover the thrilling world of STALKER Legends of the Zone and uncover powerful artifacts using your detector.
All Stash Locations In Swamps in Stalker 2 Heart Of Chornobyl
Discover all stash locations in the swamps of Stalker 2: Heart Of Chornobyl.
How to Fix Stalker 2 Not Using GPU and Crashing at 100% CPU Usage
Stalker 2 not using your GPU and maxing out your CPU? Learn how to fix performance issues and crashes with our troubleshooting guide.
How to Open River Port Locked Door In Pripyat in Stalker 2
On this occasion we return with a guide with the objective of explaining to you How to Open River Port Locked Door In Pripyat in Stalker 2.
How To Unlock CSC Building Basement Steel Door in Pripyat in Stalker 2
Our guide today is intended to explain to you everything about How To Unlock CSC Building Basement Steel Door in Pripyat in Stalker 2.
How To Get The Unique Texan Shotgun in Stalker 2
We invite you to discover How To Get The Unique Texan Shotgun in Stalker 2 with this detailed guide that we offer here.
How to get the Weird Water artifact in Stalker 2
Today we bring you an explanatory guide on How to get the Weird Water artifact in Stalker 2 so that you can have this important element.
How to open the Waste Processing Center stash in Stalker 2
Today we bring you an explanatory guide on How to open the Waste Processing Center stash in Stalker 2 so you can overcome this part of the game.
How to get the Railway Maintenance Facility code in Stalker 2
Today we bring you an explanatory guide with all the information you need to know about How to get the Railway Maintenance Facility code in Stalker 2.
How to complete Dead Frequency mission in Stalker 2
We have made a detailed guide to explain How to Complete Dead Frequency Mission in Stalker 2.
How to Change Servers in Destiny 2
Today we bring you an explanatory guide on How to Change Servers in Destiny 2 so that you can carry out this process without any problems.