
How To Enable “True Epic” Settings in Silent Hill F
The horror landscape has never looked more beautiful—or terrifying—thanks to the power of Unreal Engine 5 (UE5). Silent Hill f, the latest installment in the iconic franchise, showcases this potential with stunning visuals powered by core UE5 systems like Lumen Global Illumination (GI) and Nanite.However, while the in-game "Epic" preset certainly delivers a high-quality experience, there are subtle visual compromises made by the developers to ensure smooth frame rates for a wider audience. If you own a high-end PC and crave the absolute pinnacle of visual fidelity—the so-called "True Epic" settings—this guide is for you.By manipulating the game's configuration file, we can bypass these limitations, unlocking the full, uncompromised power of the UE5 engine. This means superior lighting, deeper shadows, and highly accurate reflections, turning the game's beautiful yet horrifying 1960s Japanese setting into a true next-generation visual masterpiece.
Press the Win + R keys simultaneously on your keyboard to open the Run dialog box. In the Run window, type or paste the following command: Press Enter. This will open your user's Local App Data folder in Windows Explorer. In the folder you just opened, locate the game's specific folder, which should be named SHf. Inside the SHf folder, navigate to the following path: Inside the Windows folder, right-click and choose to create a New Text Document. Rename this new document to Engine.ini. Open the newly created Engine.ini file using Notepad or any other text editor. Copy the entire block of code provided below and paste it into the document: Save the Engine.ini file and close your text editor. Right-click on the Engine.ini file and select Properties. In the General tab of the Properties window, find the Attributes section and check the box next to "Read-only". Click Apply, then OK to close the window. Launch Silent Hill f as you normally would. The "True Epic" graphics settings will now be active, dramaticallyincreasing the fidelity of lighting, reflections, and environmentalshadowing.
Discover how to locate Shu's prized possession in Silent Hill f. Uncover secrets and tips for a thrilling gaming experience!
How To Get Shriveled Abura-age in Silent Hill F
Discover how to obtain Shriveled Abura-age in Silent Hill F with our guide. Unlock secrets and enhance your gameplay
How To Enable “True Epic” Settings in Silent Hill F
Unlock the horror in Silent Hill F with True Epic settings for an immersive gaming experience. Dive into the chilling atmosphere
How To Get Combination Lock Dial in Silent Hill F
Unlock new paths and secrets. Learn how to find the Combination Lock Dial, acrucial inventory item for solving puzzles and progressing in SilentHill f.
How To Get Raygun in Silent Hill F
Uncover the secrets to obtaining the powerful Raygun in SilentHill F. Our guide reveals the hidden steps and locations you need toconquer the horrors that await.
How To Beat Birthing Monster in Silent Hill F
Survive the nightmare. Our guide reveals essential tips and strategies to defeat the terrifying Birthing Monster boss in Silent Hill f. Learn how to conquer this horror and progress.
How to Get Divine Water in Silent Hill f
Discover how to obtain Divine Water in Silent Hill f with our comprehensive guide. Unlock secrets and enhance your gameplay
How to Solve the Ominous Photo Puzzle in Silent Hill f
Unravel the mystery in Silent Hill f as you solve the chilling Ominous Photo Puzzle. Dive into the eerie atmosphere and test your wits!
How to Get Antique Comb in Silent Hill f
Uncover the secrets of the antique comb in Silent Hill f. This guide revealsits location and crucial role in solving the puzzles that block yourpath forward.
Where to Find Hinako's Diary in Silent Hill f
Uncover the secrets of Silent Hill f. Discover the exact location of Hinako'sDiary and the chilling revelations hidden within its pages.
How to Win at Zeni Hajiki in Ghost of Yotei
Master Zeni Hajiki in Ghost of Yotei. Our guide reveals the best strategies,timing tips, and locations to maximize your profits and win thischallenging mini-game.
How To Unlock New Music in Skate
Unlock new music in Skate with our ultimate guide! Discover tips and tricks to enhance your gaming experience and enjoy fresh tracks.
How to Learn All Shamisen Songs in Ghost of Yotei
Master every Ghost of Yotei shamisen song. This guide covers song locations,mini-game tips, and strategies to unlock all melodies and complete yourcollection.
How to Increase Agent Rank in Digimon Story Time Stranger
Boost your Digimon's power & climb the ranks! Learn the beststrategies for raising stats, evolving, & mastering combat inDigimon Story: Time Stranger.
How to Get Skeleton Key in CloverPit
Unlock any door! Learn how to get the Skeleton Key in CloverPitwith our step-by-step guide. Find locations, strategies, and tips toobtain this powerful item.
Silent Hill F: Enable “True Epic” Settings
The Technical Trade-Off: Why "True Epic" is Hidden
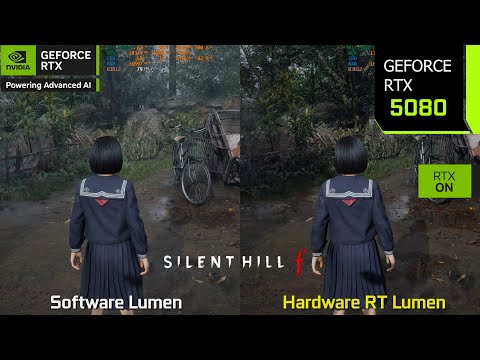
The visual experience in Silent Hill f is already impressive, utilizing UE5's advanced systems. Yet, a closer inspection reveals where optimizations were prioritized for performance:- Lumen GI Implementation: The game primarily uses the software-based Lumen GI system. While effective, this can result in slightly softer reflections and less detailed indirect lighting compared to its hardware-accelerated counterpart.
- Missing Environmental Detail: Even on the highest in-game settings, minor environmental elements like foliage, small plants, and grass often lack proper Ambient Occlusion (AO). This minor detail makes them look flat or disconnected from the lighting environment, especially at the base.
- Nerfed Core Effects: To achieve the targeted high frame rates across different PC configurations, developer Konami subtly dialed back the quality of core graphics features such as Global Illumination (GI), Ambient Occlusion (AO), and even shadow resolution.
What to Expect from "True Epic" Settings
Enabling the full "True Epic" configuration will dramatically upgrade the game’s rendering across every environment. The key improvements include:- Hardware-Accelerated Lumen (Ray Tracing): This modification forces the game to use Hardware Lumen Ray Tracing for Global Illumination and Reflections, resulting in physically accurate reflections and vastly improved light bounces that dynamically update the scene.
- Enhanced Environmental Realism: You will see a significant improvement in ambient shadowing. Foliage, grasses, and small details will now receive accurate AO, making them look naturally embedded in the scene and far more realistic.
- Deeper, More Detailed Shadows: The shadows, both virtual and standard, will receive a massive resolution boost, eliminating fuzzy edges and giving the world a greater sense of depth and realism.
Step-by-Step Guide to Activating "True Epic" Graphics
Follow these precise steps to manually enable the full power of Unreal Engine 5 in Silent Hill f.
Step 1: Access the Local Application Data Folder
%localappdata%
Step 2: Navigate to the Configuration Directory
Saved\Config\Windows
Step 3: Create the Engine Configuration File
- Crucial Note: Ensure you replace the entire .txt extension with .ini. If your file extensions are hidden, you may need to enable them in your File Explorer View settings. The final file name must be exactly Engine.ini.
Step 4: Paste the Configuration Code
Ini, TOML
[SystemSettings]r.Lumen.HardwareRayTracing=1r.Lumen.Reflections.HardwareRayTracing=1r.Lumen.ScreenProbeGather.HardwareRayTracing=1r.LumenScene.DirectLighting.HardwareRayTracing=1r.ContactShadows.OverrideLengthInWS=1r.ContactShadows.OverrideLength=25r.ContactShadows.OverrideShadowCastingIntensity=1r.ContactShadows.OverrideNonShadowCastingIntensity=1r.SkylightIntensityMultiplier=0.65r.ShadowQuality=5r.Shadow.Virtual.ForceOnlyVirtualShadowMaps=0r.Shadow.Virtual.ResolutionLodBiasLocal=-2.0r.Shadow.Virtual.ResolutionLodBiasLocalMoving=-2.0r.Shadow.Virtual.ResolutionLodBiasDirectional=-1.0r.Shadow.Virtual.smrt.samplesperraylocal=2r.Shadow.Virtual.smrt.samplesperrayhair=2r.Shadow.Virtual.smrt.samplesperraydirectional=2r.Shadow.Virtual.smrt.texelditherscalelocal=4r.Shadow.Virtual.SMRT.TexelDitherScaleDirectional=6r.Shadow.Virtual.ScreenRayLength=0.02r.Shadow.InsetDownscaleFactor=0r.Shadow.PerObjectDirectionalDepthBias=0.5r.Shadow.PerObjectDirectionalSlopeDepthBias=3r.Shadow.PerObjectSpotLightDepthBias=0.5r.Shadow.PerObjectSpotLightSlopeDepthBias=3r.Shadow.ShadowMaxSlopeScaleDepthBias=3r.Shadow.SpotLightDepthBias=0.5r.lumen.tracemeshsdfs=1r.Lumen.TraceMeshSDFs.TraceDistance=240r.Lumen.ScreenTracingSource=1r.Lumen.DiffuseIndirect.SurfaceBias=8r.LumenScene.DirectLighting.UpdateFactor=8r.LumenScene.Radiosity.UpdateFactor=4r.LumenScene.Radiosity.MaxRayIntensity=99r.Lumen.ScreenProbeGather.TraceMeshSDFs=0r.Lumen.ScreenProbeGather.DownsampleFactor=12r.Lumen.ScreenProbeGather.MaxRayIntensity=1r.Lumen.ScreenProbeGather.MaxRoughnessToEvaluateRoughSpecular=2r.Lumen.ScreenProbeGather.MaxRoughnessToEvaluateRoughSpecularForFoliage=1r.Lumen.ScreenProbeGather.ScreenTraces.HZBTraversal.SkipHairHits=0r.Lumen.ScreenProbeGather.ScreenTraces.HZBTraversal.SkipFoliageHits=0r.Lumen.ScreenProbeGather.ScreenTraces.HZBTraversal.FullResDepth=1r.Lumen.ScreenProbeGather.ScreenTraces.HZBTraversal.MaxIterations=30r.Lumen.ScreenProbeGather.ScreenTraces.HZBTraversal.RelativeDepthThickness=0.2r.Lumen.ScreenProbeGather.ShortRangeAO.ScreenSpace.SlopeCompareToleranceScale=4.0r.Lumen.ScreenProbeGather.ShortRangeAO.ScreenSpace.FoliageOcclusionStrength=1.0r.Lumen.ScreenProbeGather.ShortRangeAO.MaxMultibounceAlbedo=0.8r.Lumen.ScreenProbeGather.ShortRangeAO.ApplyDuringIntegration=0r.Lumen.ScreenProbeGather.RadianceCache.ProbeResolution=64r.Lumen.ScreenProbeGather.RoughSpecularSamplingMode=1r.Lumen.ScreenProbeGather.DiffuseIntegralMethod=0r.Lumen.ScreenProbeGather.Temporal.MaxFramesAccumulated=4r.Lumen.Reflections.RadianceCache=1r.Lumen.Reflections.GGXSamplingBias=0.7r.Lumen.Reflections.HierarchicalScreenTraces.MaxIterations=96r.Lumen.Reflections.SmoothBias=0.76r.Lumen.Reflections.MaxRoughnessToTrace=0.63r.Lumen.Reflections.Temporal.MaxFramesAccumulated=0r.Lumen.Reflections.DownsampleFactor=0r.Lumen.Reflections.HiResSurface=1r.Lumen.Reflections.SampleSceneColorAtHit=1r.Lumen.Reflections.SpecularScale=0.8r.Lumen.TranslucencyVolume.MaxRayIntensity=0.62r.Lumen.TranslucencyReflections.FrontLayer.Enable=1r.Lumen.TranslucencyReflections.FrontLayer.Allow=1r.SSR.Quality=4r.SSR.MaxRoughness=1r.SSR.Stencil=1r.VolumetricFog.GridPixelSize=7r.VolumetricFog.GridSizeZ=192r.VolumetricFog.UpsampleJitterMultiplier=0.55r.VolumetricCloud.EnableLocalLightsSampling=1r.VolumetricRenderTarget.Mode=3r.SSS.Scale=3.5r.SSS.SampleSet=2r.SSS.Quality=1r.SSS.HalfRes=0r.SSS.Filter=1r.Water.SingleLayerWater.SupportCloudShadow=1r.ParallelShadowsNonWholeScene=1
Step 5: Save and Apply Read-Only Attribute
Setting the file to "Read-only" is essential. This prevents the game from overwriting your custom settings when it launches.
Step 6: Launch and Confirm
If you find the performance hit too severe, simply uncheck the "Read-only" attribute on the Engine.ini file, and the game will revert to its standard settings when relaunched. Enjoy the terrifying beauty of the True Epic settings!
Platform(s): PlayStation 5 PS5, Xbox Series X/S, Windows PC
Genre(s): Survival Horror, Action
Developer(s): Neobards Entertainment
Publisher(s): Konami
Engine: Unreal Engine 5
Release date: September 25, 2025
Mode: Single-player
Age rating (PEGI): +18
Other Articles Related
How to Find Shu’s Prized Possession in Worship Hall in Silent Hill fDiscover how to locate Shu's prized possession in Silent Hill f. Uncover secrets and tips for a thrilling gaming experience!
How To Get Shriveled Abura-age in Silent Hill F
Discover how to obtain Shriveled Abura-age in Silent Hill F with our guide. Unlock secrets and enhance your gameplay
How To Enable “True Epic” Settings in Silent Hill F
Unlock the horror in Silent Hill F with True Epic settings for an immersive gaming experience. Dive into the chilling atmosphere
How To Get Combination Lock Dial in Silent Hill F
Unlock new paths and secrets. Learn how to find the Combination Lock Dial, acrucial inventory item for solving puzzles and progressing in SilentHill f.
How To Get Raygun in Silent Hill F
Uncover the secrets to obtaining the powerful Raygun in SilentHill F. Our guide reveals the hidden steps and locations you need toconquer the horrors that await.
How To Beat Birthing Monster in Silent Hill F
Survive the nightmare. Our guide reveals essential tips and strategies to defeat the terrifying Birthing Monster boss in Silent Hill f. Learn how to conquer this horror and progress.
How to Get Divine Water in Silent Hill f
Discover how to obtain Divine Water in Silent Hill f with our comprehensive guide. Unlock secrets and enhance your gameplay
How to Solve the Ominous Photo Puzzle in Silent Hill f
Unravel the mystery in Silent Hill f as you solve the chilling Ominous Photo Puzzle. Dive into the eerie atmosphere and test your wits!
How to Get Antique Comb in Silent Hill f
Uncover the secrets of the antique comb in Silent Hill f. This guide revealsits location and crucial role in solving the puzzles that block yourpath forward.
Where to Find Hinako's Diary in Silent Hill f
Uncover the secrets of Silent Hill f. Discover the exact location of Hinako'sDiary and the chilling revelations hidden within its pages.
How to Win at Zeni Hajiki in Ghost of Yotei
Master Zeni Hajiki in Ghost of Yotei. Our guide reveals the best strategies,timing tips, and locations to maximize your profits and win thischallenging mini-game.
How To Unlock New Music in Skate
Unlock new music in Skate with our ultimate guide! Discover tips and tricks to enhance your gaming experience and enjoy fresh tracks.
How to Learn All Shamisen Songs in Ghost of Yotei
Master every Ghost of Yotei shamisen song. This guide covers song locations,mini-game tips, and strategies to unlock all melodies and complete yourcollection.
How to Increase Agent Rank in Digimon Story Time Stranger
Boost your Digimon's power & climb the ranks! Learn the beststrategies for raising stats, evolving, & mastering combat inDigimon Story: Time Stranger.
How to Get Skeleton Key in CloverPit
Unlock any door! Learn how to get the Skeleton Key in CloverPitwith our step-by-step guide. Find locations, strategies, and tips toobtain this powerful item.