
All 5 Protectorate Armorial ID Locations in Outer Worlds 2
The colossal Skycutter Tower in The Outer Worlds 2 hides a significant secret: a large, sealed Protectorate container holding valuable loot. However, accessing this treasure vault is no simple feat; it requires finding and collecting five Protectorate Armorial IDs scattered across the tower’s multiple, heavily defended floors.Your journey will be fraught with danger, facing off against both corporate Protectorate units and the dangerous local wildlife, the Raptidons. Each ID is typically found near a fallen warden, marking a previous skirmish.This guide provides a detailed walkthrough, floor-by-floor, to help you navigate the Skycutter Tower, neutralize the threats, collect all five Armorial IDs, and finally unlock the coveted container. Return: Fast travel or backtrack down to the first floor where the container is located. Unlock: Interact with the large Protectorate container again. It will finally open, revealing your rewards:
Discover the fastest ways to earn Bits in The Outer Worlds 2. Learn efficient money-making strategies, top farming methods, and insider tips to maximize your wealth quickly and upgrade your gear without grinding endlessly.
How to Solve Order Initiate Scavenger Hunt Puzzle in Outer Worlds 2
Stuck on the Order Initiate scavenger hunt in Outer Worlds 2? Our guidereveals the solution to this tricky puzzle. Find all the clues, decodethe messages, and claim your unique reward with our step-by-stepwalkthrough.
Where to Find Substation Repair Kit in Outer Worlds 2
the location of the Substation Repair Kit in Outer Worlds 2. Unlock secrets and enhance your gameplay with our guide!
How to Get Rookie's Reward in Outer Worlds 2
Learn how to build Yidhari in Zenless Zone Zero with our complete guide. Getthe best W-Engine, Drive Discs, team comps, and skill priorities tomaximize her healing and support potential.
Where to Get the Westport Generator Station Key in Outer Worlds 2
Struggling to find the Westport Generator Station Key in Outer Worlds 2? Discoverits exact location and the easiest way to get inside the power plant.
How to Get Savannah's Journal in Outer Worlds 2
Searching for Savannah's Journal in Outer Worlds 2? Discover the step-by-stepguide to locate this hidden collectible, unlock its lore secrets, andcomplete this elusive side quest.
How to Open Kaur's War Chest in Outer Worlds 2
Stuck on Kaur's War Chest? Discover the step-by-step guide to unlock thisvaluable loot cache in Outer Worlds 2 and claim your rewards.
How To Get All Pets in Outer Worlds 2
Maximize your companions in Outer Worlds 2! This guide reveals how to find,recruit, and befriend every pet across the Halcyon colony for theultimate space adventure.
How To Respec in Outer Worlds 2
Learn how to respec your character in Outer Worlds 2. Our guide coversfinding the Respec station, the cost, and what stats you can reallocateto optimize your build.
How to Complete Schemes of the Secret Smugglers Quest in Outer Worlds 2
Struggling with the Schemes of the Secret Smugglers in OuterWorlds 2? Our guide reveals how to start the quest, find all key items,and choose the best rewards to complete this tricky smuggling operation.
All Legendary Unique Armour in The Outer Worlds 2
all the legendary unique armor in Outer Worlds 2! Enhance your gameplay with our guide to the best gear available.
All Excogitation Audio Logs Locations in The Outer Worlds 2
all Excogitation Audio Logs in Outer Worlds 2. Uncover secrets, enhance your gameplay, and dive deeper into the universe!
How to use EpiPen in RV There Yet
Learn how to effectively use an EpiPen with our comprehensive guide.Stay prepared for allergic reactions and ensure your safety on the road.
How to Fix Powerwash Simulator 2 items not showing error
Struggling with missing items in Powerwash Simulator 2? Explore ourexpert tips and fixes to resolve the issue
How many players can play RV There Yet
Learn about the player capacity in RV There Yet. Find out how to enjoythis exciting game with your friends and make the most of youradventure.
Outer Worlds 2: All Protectorate Armorial ID
ID #1: The Container Room (Lower Level)
Your hunt begins right after entering the Skycutter Tower, on the lowest accessible floor.- Initial Descent: Upon entering the building, head down to the lower levels.
- Encounter: You'll immediately face a Raptidon Hunter near a workbench. Be prepared, as a second Raptidon will drop from the ceiling during the fight. Both creatures possess the ability to turn invisible, so stay alert.
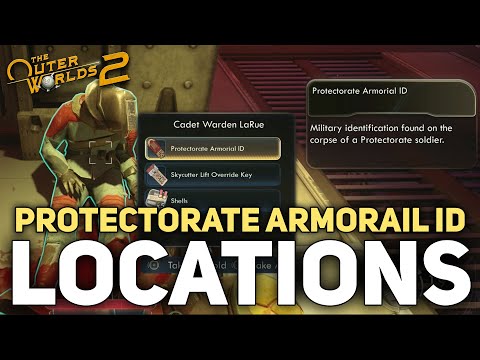
- Loot and Key: After defeating the creatures, look for a warden's body in the corner. Looting it provides your first Protectorate Armorial ID, the Skycutter Entrance Key, and a Jewelled Ring.
- Bonus Finds: Nearby, you can also grab Mercy Oxymorphone, Short Rounds, and Black Powder.
- Check the Container: Once done, interact with the large Protectorate container in this room. You'll receive a message confirming you need four more IDs to open it.
ID #2: Clearing the Elevator Chamber (Deck 1/2)
The second ID is found in the main, heavily guarded chamber just beyond the entrance area.
- Pass the Locked Door: Return to the locked door you saw earlier. You now have the Skycutter Entrance Key to unlock it, or you can use your Lockpick skill.
- The Ambush: Entering this area reveals a large space centered around the mainelevator shaft. Prepare for a fierce battle against several enemies: 2 Sentry Turrets, 2 Protectorate Dragoons, and 2 Protectorate Wasps. Clear out all the threats before proceeding.
- The Find: Search the floor, focusing on the south side near the middle of the room. Here, you'll find another warden's corpse. Loot the body to acquire your second Protectorate Armorial ID, along with a x13 Bit Cartridge, Mercy Oxymorphone, and Regal Tarts.
ID #3: The Double Jump Challenge (Deck 3)
Since the central elevator is currently inactive, you must proceed upward via the maintenance paths.
- Ascend to Deck 3: Use the stairs located in the northeast corner of the main chamber. Keep climbing until you find a ladder leading to the next floor.
- Encounter: Two more Raptidons will be waiting for you. Eliminate them.
- The Gap: To reach the next warden's body, you must double-jump across a gap separating two platforms on Deck 3.
- The Find: The corpse holds the third Protectorate Armorial ID and x4 Shells.
ID #4: The Elevator Override (Deck 6)
Continue your upward climb, focusing on reaching the terminal that can restore power to the main elevator.
- Continue Climbing: Follow the pathway upward until you reach Deck 6.
- The Cadet: Near the elevator terminal, you will find the body of a Cadet Warden.
- The Find: Loot the corpse to collect the fourth Protectorate Armorial ID, the Skycutter Lift Override Key, and x9 Short Rounds.
- Activate the Lift: Use the newly acquired key to interact with the elevator terminal and power up the lift system.
ID #5: The Roof and The Legendary Melee Weapon
The final ID is on the roof, but the ride up is a final, grueling test.
- Ascend: Call the now-working elevator down to Deck 6 and ride it to the top floor.
- Raptidon Waves: Be ready, as you will be attacked by waves of Raptidons (usually two or three at a time) during the ascent. Defeat them all to continue.
- The Roof: Once you reach the top, exit the elevator and step onto the outer catwalk.
- The Final Warden: Check the area near the Control Panel. The final warden’s body contains the fifth Protectorate Armorial ID, the Control Panel Schematics, and a Repeating Rifle.
- The Treasure: Look closely! Next to this body, a legendary melee weapon, The Thunderstruck, is stuck in the wall. This weapon is a must-have for melee builds, as its heavy attacks fire shock projectiles.
Unlocking the Protectorate Container
With all five Armorial IDs secured, it’s time to claim your reward.
- Vestige Datapad (for lore and quests)
- x934 Bit Cartridge (a nice chunk of currency)
- Advanced Decryption Key (for other high-security locks)
- Trauma Kit (vital medical supply)
Congratulations, Captain. You have successfully navigated the Skycutter Tower's deadlydefenses and claimed its secret bounty, earning valuable gear and keycurrency for your continuing journey through the Halcyon system.
Mode:
Other Articles Related
How To Earn Bits Fast in The Outer Worlds 2Discover the fastest ways to earn Bits in The Outer Worlds 2. Learn efficient money-making strategies, top farming methods, and insider tips to maximize your wealth quickly and upgrade your gear without grinding endlessly.
How to Solve Order Initiate Scavenger Hunt Puzzle in Outer Worlds 2
Stuck on the Order Initiate scavenger hunt in Outer Worlds 2? Our guidereveals the solution to this tricky puzzle. Find all the clues, decodethe messages, and claim your unique reward with our step-by-stepwalkthrough.
Where to Find Substation Repair Kit in Outer Worlds 2
the location of the Substation Repair Kit in Outer Worlds 2. Unlock secrets and enhance your gameplay with our guide!
How to Get Rookie's Reward in Outer Worlds 2
Learn how to build Yidhari in Zenless Zone Zero with our complete guide. Getthe best W-Engine, Drive Discs, team comps, and skill priorities tomaximize her healing and support potential.
Where to Get the Westport Generator Station Key in Outer Worlds 2
Struggling to find the Westport Generator Station Key in Outer Worlds 2? Discoverits exact location and the easiest way to get inside the power plant.
How to Get Savannah's Journal in Outer Worlds 2
Searching for Savannah's Journal in Outer Worlds 2? Discover the step-by-stepguide to locate this hidden collectible, unlock its lore secrets, andcomplete this elusive side quest.
How to Open Kaur's War Chest in Outer Worlds 2
Stuck on Kaur's War Chest? Discover the step-by-step guide to unlock thisvaluable loot cache in Outer Worlds 2 and claim your rewards.
How To Get All Pets in Outer Worlds 2
Maximize your companions in Outer Worlds 2! This guide reveals how to find,recruit, and befriend every pet across the Halcyon colony for theultimate space adventure.
How To Respec in Outer Worlds 2
Learn how to respec your character in Outer Worlds 2. Our guide coversfinding the Respec station, the cost, and what stats you can reallocateto optimize your build.
How to Complete Schemes of the Secret Smugglers Quest in Outer Worlds 2
Struggling with the Schemes of the Secret Smugglers in OuterWorlds 2? Our guide reveals how to start the quest, find all key items,and choose the best rewards to complete this tricky smuggling operation.
All Legendary Unique Armour in The Outer Worlds 2
all the legendary unique armor in Outer Worlds 2! Enhance your gameplay with our guide to the best gear available.
All Excogitation Audio Logs Locations in The Outer Worlds 2
all Excogitation Audio Logs in Outer Worlds 2. Uncover secrets, enhance your gameplay, and dive deeper into the universe!
How to use EpiPen in RV There Yet
Learn how to effectively use an EpiPen with our comprehensive guide.Stay prepared for allergic reactions and ensure your safety on the road.
How to Fix Powerwash Simulator 2 items not showing error
Struggling with missing items in Powerwash Simulator 2? Explore ourexpert tips and fixes to resolve the issue
How many players can play RV There Yet
Learn about the player capacity in RV There Yet. Find out how to enjoythis exciting game with your friends and make the most of youradventure.