
How To Make a Flying Machine in Lego Fortnite
Discover the secrets of How To Make a Flying Machine in Lego Fortnite with our step-by-step guide.
Are you a Lego enthusiast and a Fortnite fan? Do you want to take your game to the next level and explore the map like never before? Well, you're in luck! In this blog post, we will guide you through the steps to create your very own flying machine using Lego bricks. With just a few simple steps, you'll be soaring through the map in no time!
The first step in building your flying machine is to create a base platform. This will serve as the foundation for all of your other pieces. You can use any Lego bricks you have on hand to create your platform, but be sure to make it sturdy and stable so that it can support the weight of your flying machine.
Once you have your platform in place, it's time to add flooring. This will give you a sturdy surface to work with as you build upwards. You can use any Lego bricks you have on hand, but be sure to cover the entire platform to ensure it's strong enough to support your flying machine.
Looking for the free Clyde Fortnite skin? Learn the exact steps to unlock thisexclusive cosmetic in Chapter 5 Season 3 through the Guitar Heistquestline.
All Secret Loot Rooms & Easter Eggs in Fortnite Chapter 7 Season 1
all secret loot rooms and hidden Easter eggs in Fortnite! Uncover tips and tricks to enhance your gaming experience.
All Reboot Van Locations in Fortnite Chapter 7 Season 1
Discover every Reboot Van location in Fortnite Chapter 7 Season 1. Get the fullmap guide to revive your squad and secure that Victory Royale.
Where to Find Drivable Reboot Vans in Fortnite Chapter 7
Find drivable Reboot Vans across the Fortnite Chapter 7 map with ourlocations guide. Learn where to get your squad back in the fight andsecure victory.
All New Mechanics in Fortnite Chapter 7
the exciting new mechanics in Fortnite Chapter 7! Unleash your skills and strategies with the latest updates. Join the battle now!
How to Find Battle Bus Parts in Fortnite
essential tips on locating Battle Bus parts in Fortnite. Enhance your gameplay and master the art of scavenging with our guide!
What to Do With the Unstable Element in Fortnite
strategies for handling the Unstable Element in Fortnite. Unlock secrets and enhance your gameplay with our expert tips!
How to Self-Revive in Fortnite
Learn how to self-revive in Fortnite with our step-by-step guide. Master this essential skill to enhance your gameplay
How to Get the Forsaken Vow Blade in Fortnite
how to obtain the Forsaken Vow Blade in Fortnite. Unlock its powerfulabilities and enhance your gameplay with this exclusive weapon.
How to Lift the 515 KG Weight in Fortnite
expert tips and strategies to successfully lift the 515 KG weight inFortnite. Boost your gameplay and impress your friends with this guide!
How to Make Biryani in Disney Dreamlight Valley
Discover the secrets of How to Make Biryani in Disney Dreamlight Valley.
How to Unlock Gaston’s Stall in Disney Dreamlight Valley
Discover the secrets to How to Unlock Gaston’s Stall in Disney Dreamlight Valley and enhance your magical experience.
How to Get All Palcat Party Twitch Drop Items in Palia
Discover the secrets of How to Get All Palcat Party Twitch Drop Items in Palia and enhance your gaming experience
How to Get Paprika in Disney Dreamlight Valley
Discover the secrets of How to Get Paprika in Disney Dreamlight Valley and enhance your culinary adventures.
How to Get Dates in Disney Dreamlight Valley
Discover the secrets to finding romance in the How to Get Dates in Disney Dreamlight Valley.
Are you a Lego enthusiast and a Fortnite fan? Do you want to take your game to the next level and explore the map like never before? Well, you're in luck! In this blog post, we will guide you through the steps to create your very own flying machine using Lego bricks. With just a few simple steps, you'll be soaring through the map in no time!
How To Make a Flying Machine in Lego Fortnite
Step 1: Create a platform
The first step in building your flying machine is to create a base platform. This will serve as the foundation for all of your other pieces. You can use any Lego bricks you have on hand to create your platform, but be sure to make it sturdy and stable so that it can support the weight of your flying machine.
Step 2: Lay down flooring
Once you have your platform in place, it's time to add flooring. This will give you a sturdy surface to work with as you build upwards. You can use any Lego bricks you have on hand, but be sure to cover the entire platform to ensure it's strong enough to support your flying machine.
Step 3: Place two fences
Next, you'll want to place two fences on top of your flooring, positioned parallel to each other. These will act as supports for the rest of your structure and provide stability for your flying machine.
Step 4: Place four small platforms
Add four small platforms on top of the fences, evenly spaced apart. These will serve as landing pads for your flying machine. Be sure to attach them securely to the fences to ensure they're stable and won't wobble.
Step 5: Add more fences
Now that you have your landing pads in place, you'll want to add additional fences between the small platforms and around the edges of your base platform. This will provide additional support and stability for your flying machine.
Step 6: Create a pillar with a thruster
To provide the power needed to lift off, you'll need to build a pillar towards one end of your structure and attach a thruster at the top. This will be the heart of your flying machine and the key to getting it off the ground.
Step 7: Add a floor piece
Attach another floor piece on top of the pillar and connect it to the rest of your structure with fencing. This will provide additional stability and create a solid connection between the thruster and the rest of your flying machine.
Step 8: Add wheels
To make it easier to move your flying machine before takeoff, you'll want to attach wheels underneath your structure. This will allow you to maneuver it into position and make sure everything is in place before you take off.
Step 9: Add a third activation switch
Now that your structure is almost complete, you'll want to install a third activation switch in the center of your structure. This will allow you to control when you take off and land, giving you complete control over your flying machine.
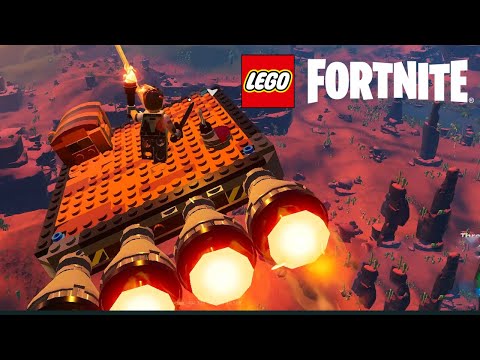
Step 10: Add six thrusters and eight balloons
To provide additional lift and stability, you'll want to attach six additional thrusters evenly throughout your structure. This will help keep your flying machine in the air and make it easier to control. Finally, add eight balloons around the bottom perimeter of your structure to help keep it buoyant and stable.
Congratulations, you've now built your very own flying machine using Lego bricks! To take off, evenly distribute weight across the four landing pads and activate the center switch. Your flying machine should rise into the air and allow you to explore the Fortnite map like never before.
In conclusion, building a Lego Fortnite flying machine is a fun and rewarding project for any Lego enthusiast and Fortnite fan. With just a few simple steps, you can create a unique and personalized flying machine that will allow you to explore the map like never before. So why not give it a try and see where your imagination takes you? Happy building!
Tags: Battle Royale, Fortnite Skins, V-Bucks, Fortnite Challenges, Fortnite Events, Fortnite Map, Fortnite Weapons, Fortnite S
Platform(s): Microsoft Windows PC, macOS, PlayStation 4 PS4, Xbox One, Nintendo Switch, PlayStation 5 PS5, Xbox Series X|S Android, iOS
Genre(s): Survival, battle royale, sandbox
Developer(s): Epic Games
Publisher(s): Epic Games
Engine: Unreal Engine 5
Release date: July 25, 2017
Mode: Co-op, multiplayer
Age rating (PEGI): 12+
Other Articles Related
How to Get the Free Clyde Skin in FortniteLooking for the free Clyde Fortnite skin? Learn the exact steps to unlock thisexclusive cosmetic in Chapter 5 Season 3 through the Guitar Heistquestline.
All Secret Loot Rooms & Easter Eggs in Fortnite Chapter 7 Season 1
all secret loot rooms and hidden Easter eggs in Fortnite! Uncover tips and tricks to enhance your gaming experience.
All Reboot Van Locations in Fortnite Chapter 7 Season 1
Discover every Reboot Van location in Fortnite Chapter 7 Season 1. Get the fullmap guide to revive your squad and secure that Victory Royale.
Where to Find Drivable Reboot Vans in Fortnite Chapter 7
Find drivable Reboot Vans across the Fortnite Chapter 7 map with ourlocations guide. Learn where to get your squad back in the fight andsecure victory.
All New Mechanics in Fortnite Chapter 7
the exciting new mechanics in Fortnite Chapter 7! Unleash your skills and strategies with the latest updates. Join the battle now!
How to Find Battle Bus Parts in Fortnite
essential tips on locating Battle Bus parts in Fortnite. Enhance your gameplay and master the art of scavenging with our guide!
What to Do With the Unstable Element in Fortnite
strategies for handling the Unstable Element in Fortnite. Unlock secrets and enhance your gameplay with our expert tips!
How to Self-Revive in Fortnite
Learn how to self-revive in Fortnite with our step-by-step guide. Master this essential skill to enhance your gameplay
How to Get the Forsaken Vow Blade in Fortnite
how to obtain the Forsaken Vow Blade in Fortnite. Unlock its powerfulabilities and enhance your gameplay with this exclusive weapon.
How to Lift the 515 KG Weight in Fortnite
expert tips and strategies to successfully lift the 515 KG weight inFortnite. Boost your gameplay and impress your friends with this guide!
How to Make Biryani in Disney Dreamlight Valley
Discover the secrets of How to Make Biryani in Disney Dreamlight Valley.
How to Unlock Gaston’s Stall in Disney Dreamlight Valley
Discover the secrets to How to Unlock Gaston’s Stall in Disney Dreamlight Valley and enhance your magical experience.
How to Get All Palcat Party Twitch Drop Items in Palia
Discover the secrets of How to Get All Palcat Party Twitch Drop Items in Palia and enhance your gaming experience
How to Get Paprika in Disney Dreamlight Valley
Discover the secrets of How to Get Paprika in Disney Dreamlight Valley and enhance your culinary adventures.
How to Get Dates in Disney Dreamlight Valley
Discover the secrets to finding romance in the How to Get Dates in Disney Dreamlight Valley.