徹底攻略ガイドで、サムス・アランの体力を最大まで強化し、秘密の場所をすべて発見しましょう。Metroid Prime 4では、エネルギー貯蔵量を増やすことが、ゲームで最も困難な戦闘を生き残るために不可欠です。重要な経路上には少数のエネルギータンクがありますが、大部分は巧妙に隠されているため、鋭い探索とサムスの進化する武器庫の戦略的な使用が求められます。
このガイドでは、ストーリーを通してアンロックされる能力に合わせて、14種類の収集品すべてを見つけるための、ネタバレ注意のステップバイステップのルートを解説しています。さあ、探しに行きましょう。
Metroid Prime 4の世界は、非線形の探索を念頭に置いて設計されています。しかし、多くのエリアとその秘密は、特定のアップグレードによってのみ解禁されます。ここで紹介する順番は、後戻りを最小限に抑える論理的な進行に従っており、必要なツールが揃い次第、各戦車をすぐに確保できます。
1位:UTOリサーチセンター(保証)
入手方法:このタンクは絶対に見逃せません。プロローグエリアの序盤のモーフボールチュートリアルで見つかります。体力強化の入門編として役立ちます。
#2: フューリーグリーン - クリフサイドゲート
必須アビリティ:サイキックグローブ
入手方法:サイキックグローブを入手後、クリフサイドゲートにある2つのエネルギーモートで封印された扉を見つけます。扉を開け、サイキックバイザーを使って内部の安全な容器の模様をなぞると、タンクが現れます。
#3: ボルトフォージ(ボス報酬)
入手方法: Volt Forge でのハンター Sylux との最初の大規模な対決は、勝利の報酬としてこのエネルギー タンクで終わります。
#4: 氷帯 - 発電機
必要な能力:コントロールビーム
入手方法:発電機室で、コントロールビームを使って機械を起動します。近くの端末から床に新しい道が開きます。そこからモーフボールトンネルを進み(爆弾を使って障害物を除去)、この隠れたアップグレードを見つけます。
5: 思考の梯子の神殿(ソルバレー)
必須アビリティ:ファイアショット
入手方法:ソルバレーの西側にあるこの祠にファイアショットを使って入ります。プラットフォームパズルをクリアした後、ドアの右側にあるクモの巣を燃やします。ここでダブルボムジャンプをします。モーフボール形態でジャンプし、頂上に爆弾を設置します。爆発直前に再びジャンプして、タンクのある高いトンネルに飛び込みます。
#6: ソルバレー - 雷鳴の輪の神殿
必須アビリティ:サイキックグローブ
How to Get: Travel to the shrinenorthwest of Flare Pool, but don’t go inside. Instead, use the PsychicGlove on the compartment on the back of the exterior statue to pry itopen and claim the tank.
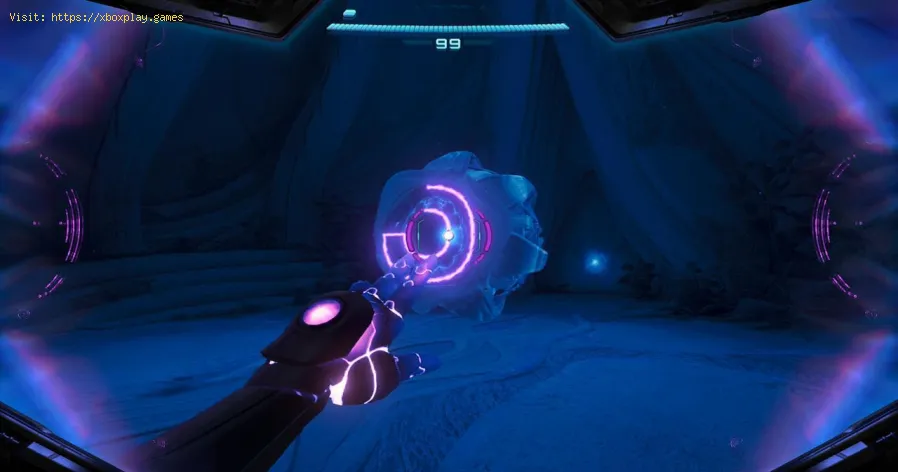
#7: Flare Pool - Storage Room
Required Ability: Psychic Visor
How to Get: Locate the large, floatingorb in the Storage Room. Engage your Psychic Visor and successfullytrace the intricate pattern on its surface to materialize the EnergyTank.
#8: Volt Forge (Boss Reward - Round 2)
Required Ability: Psychic Grapple
How to Get: A later story return toVolt Forge triggers a rematch with Sylux. Defeat him once more to earnanother substantial health increase.
#9: Fury Green - Rods of Transference
Required Abilities: Fire, Ice, and Thunder Shots
How to Get: Near your base camp, you’ll find three distinct environmental puzzles, each solvable with one ofthe elemental beams. Solve all three, and an Energy Tank willmaterialize at the feet of the central statue as your reward.
#10: Sol Valley - Volt Forge Entrance Tower
Required Ability: Thunder Shot
How to Get: Directly in front of theentrance to Volt Forge stands a tall tower. Look for a small openingnear its base and fire a Thunder Shot inside to power the mechanism,granting access to the tank within.
#11: Ice Belt - Ice Canyon
Required Ability: Psychic Grapple
How to Get: Revisit the windy IceCanyon area. Use your Psychic Visor to reveal hidden grapple points.Swing across a wide chasm using these points to reach an isolatedplatform holding this elusive tank.
#12: Great Mines - Mine Shaft Level 2
Required Abilities: Boost Ball, Psychic Visor
How to Get: In Level 2, use the BoostBall to activate a massive bridge. Then, switch to your Psychic Visor to uncover invisible platforms along the bridge’s side. Use these toascend to a ledge where the Energy Tank awaits.
#13: Flare Pool - Volcano Heart
How to Get: Return to the Volcano Heart boss arena. A small, seemingly innocuous container sits on a rock nearthe entrance. Shoot it to reveal the tank, but be ready for a chase! Aswift creature will snatch it, and you must pursue and defeat it tofinally secure your prize.
#14: Great Mines - Chasm Tunnel (Level 3)
Required Abilities: Psychic Power Bomb, Fire Shot, Boost Ball
How to Get: This final tank is a truetest of your skills. From Mines Level 2, drop down the Pit to Level 3.Progress to the Main Nest Tunnel and use a Power Bomb to destroy aGibardaum Ore wall. Ahead, use Fire Shot on a web to open a Morph Balltunnel. Inside, navigate a large half-pipe: use the Boost Ball on slopes and Tether Nodes to build speed, then execute a perfect double bombjump at the apex to reach the ultimate Energy Tank.
潜在能力を最大限に発揮せよ: 14個のエネルギータンクをすべて集めると、サムスの体力バーは最高値に達し、Metroid Prime 4の最終チャレンジに立ち向かうために必要な耐久力が得られます。賞金稼ぎよ、幸運を祈る。