
How To Equip Medium Shield in ARC Raiders
ARC Raiders: How To Equip Medium Shield
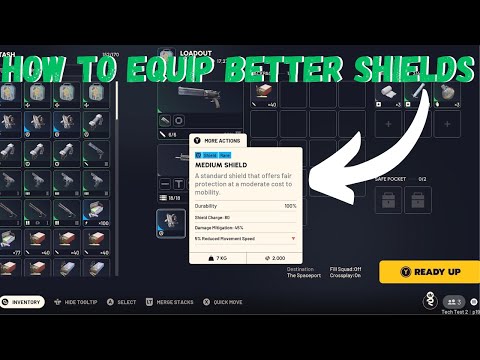
The Shield and Augment System Explained
Shield compatibility in ARC Raiders is entirely determined by the Augment you have equipped. Augments serve as the core of your loadout, controlling your carry capacity and thetype of protection you can use. To equip better shields, you must craftand purchase higher-tier Augments.
| Shield Tier | Required Augment(s) | Mobility vs. Defense | Access |
| Light | Free Loadout or Looting Augment | High Mobility, Low Defense | Available to all players (starter gear) |
| Medium | Combat MK1 or Tactical MK1 | Good Balance (Minor Mobility Loss) | Requires Augment crafting and purchase |
| Heavy | Raider Augment III+ | Low Mobility, High Defense | Requires Equipment Bench Level 3+ |
The Light Shields, available with the starter Free Loadout and Looting Augments, areperfect for scouting and looting builds as they impose no movement speed penalties. However, for direct combat, they simply don't offer enoughprotection.
How to Unlock and Equip Medium Shields
To gain access to Medium Shields, you must obtain and equip either the Combat MK1 Augment or the Tactical MK1 Augment. These two Augments specifically enable the use of Medium Shields andalso provide a welcome increase to your carrying capacity.
Step 1: Obtain a Base Augment Resource
Before you can craft the improved Augments, you first need a base resource: the Free Loadout Augment resource.
- Extraction: The easiest way to get this resource is by successfully extracting with a Free Loadout Augment after a raid.
- Crafting: Alternatively, you can craft the Free Loadout Augment resource at your Equipment Bench.
Step 2: Purchase the Improved Augment from Lance
With the base resource secured, you can now purchase the upgrade.
- Visit the Clinic: Head to the Clinic located at your base.
- Speak with Lance: Interact with the vendor, Lance, who specializes in Augment upgrades.
- Craft and Purchase: Use the Free Loadout Augment resource you acquired to craft and purchase either the Combat MK1 or the Tactical MK1 Augment.
Step 3: Equip the New Augment
- Go to the Loadout Station: Access your Loadout Station (or raid prep screen).
- Equip the Augment: Select and equip the newly purchased Combat MK1 or Tactical MK1 Augment.
Equipping one of these two Augments instantly increases your carrying capacity and, most importantly, enables the use of Medium Shields in your loadout.
The Case for the Medium Shield
While Heavy Shields offer the best protection, that high tankiness comes atthe severe cost of a significant movement penalty, making you a slowtarget. The Medium Shield, enabled by the Combat or Tactical MK1Augment, is often the most practical choice.
- Ideal Balance: Medium Shields present an ideal middle ground, effectively balancing durability and mobility. You can absorb more damage without feeling crippled by movementpenalties, allowing you to reposition during firefights or escape whenthings go sideways.
The Path to Heavy Shields
If your ultimate goal is maximum defense, you must continue your Augment progression:
- Upgrade the Equipment Bench: You will need to upgrade your home base Equipment Bench to Level 3.
- Craft High-Tier Materials: This higher-tier bench unlocks the ability to craft the necessary materials for the Raider Augment III+ and the crafting components for Heavy Shields.
Focus on the Medium Shield first; it provides a tangible upgrade insurvivability that will drastically improve your chances of extractingsuccessfully in ARC Raiders.
Other Articles Related
How to Solve All Blue Gate Puzzles in ARC RaidersStuck on the Blue Gates in ARC Raiders? Learn step-by-step strategies tosolve every Blue Gate puzzle, unlock hidden loot, and progress throughthe game with ease.
How To Beat a Shredder in ARC Raiders
Master the fight against the deadly Shredder in ARC Raiders. Learn provenstrategies for dodging attacks, targeting weak points, and securingvictory with our expert combat guide.
How to Use Buried City JKV Employee Access Card in ARC Raiders
Strategize your infiltration in ARC Raiders. Learn how to use the Buried City JKVEmployee Access Card to unlock restricted areas and secure high-tierloot. Master this key mechanic for a tactical advantage.
Where to Use Stella Montis Assembly Admin Key in ARC Raiders
Struggling to find where to use the Stella Montis Assembly Admin Key in ARCRaiders? This guide reveals the exact location and how to access thesecret loot room to claim your reward.
Where To Find Simple Gun Parts in Arc Raiders
Master your arsenal in ARC Raiders. Discover the best locations & methodsto find simple gun parts for crafting & upgrading your weapons.Loot, scavenge, and dominate the battlefield.
Where To Find Industrial Chargers in Arc Raiders
tips on locating Industrial Chargers in Arc Raiders. Enhance your gaming experience with our guide to finding these vital resources.
Where To Find ARC Circuitry in Arc Raiders
the best locations to find ARC Circuitry in Arc Raiders. Enhance yourgameplay with our comprehensive guide to essential resources.
Where To Find Voltage Convertors in Arc Raiders
Unlock the secrets of Arc Raiders with our guide on finding VoltageConverters. Maximize your resources and elevate your gaming
Blue Gate Communication Tower Key Location in Arc Raiders
the Blue Gate Communication Tower's key location in Arc Raiders. Unlockessential strategies and tips to enhance your gameplay experience.
How to Fix Arc Raiders Voice Chat Not Working Error
Resolve the Arc Raiders voice chat not working error with our step-by-step guide. Enhance your gaming experience
How To Get Riolu and Lucario in Pokemon Legends Z-A
Discover how to obtain Riolu and Lucario in Pokemon Legends Z-A. Unleash their potential and enhance your gameplay
How to Get Adrenaline Injector Kills in Battlefield 6
Master Battlefield 6 with our guide to Adrenaline Injector kills. Boost your gameplay and dominate the battlefield
What To Sell in Escape From Duckov
the best products to sell in Escape From Duckov and boost your success. Uncover top-selling items and strategies
How To Open Locked Crates in Escape From Duckov
Learn the best methods to open locked crates in Escape From Duckov. Get tipson finding keys, using lockpicks, and securing rare loot. Your ultimateguide to crate mastery.
Call Station and Supply Drops in Arc Raiders
Explore all Blue Gate tunnel locations in ARC Raiders. Find hidden entrances,secure valuable loot, and dominate the map with our complete guide.